chrome插件
这是别人开发chrome插件的过程,原文章地址 (opens new window)
5分钟上手开发浏览器插件——油猴脚手架wokoo(使用篇) (opens new window) 知乎找到的 (opens new window)
# 说明
如果直接开发油猴插件,开发者需要费时搭建vue或react基础项目,还需要对油猴脚本区域做对应的配置,开发体验差。
wokoo可以一键式生成基础项目,并且提供基础Tampermonkey配置。
主要提供的功能有:
- 命令行式创建脚手架初始项目
- 根据用户选择,生成vue、react的基本项目
- tampermonkey.js 文件中提供Tampermonkey配置
关于油猴插件和wokoo的具体使用可以阅读 5分钟上手开发浏览器插件——油猴脚手架wokoo (opens new window)
这里是wokoo脚手架代码:wokoo脚手架github仓库 (opens new window)
使用wokoo开发MoveSearch (opens new window)(划词搜索插件)
wokoo脚手架的设计参考了create-react-app (opens new window),我也曾经写过一篇分析cra源码的文章,感兴趣的同学可以阅读这篇👉create-react-app核心源码解读 (opens new window)。
# 手把手教搭建过程
- lerna: 进行项目管理
- wokoo-scripts: 和用户交互,拉取 wokoo-template,生成对应的初始项目
- wokoo-template: 提供模板来初始化一个有基础配置的油猴项目。模板有两种:react 和 vue
- 安装lerna
npm i lerna -g
- 创建项目目录,初始化
mkdir wokoo
cd wokoo
lerna init
2
3
- 开启workspace,在package.json中增加
workspaces配置
"workspaces": [
	"packages/*"
],
2
3
- 创建子项目
lerna create wokoo-scripts
lerna create wokoo-template
2
# wokoo-scripts编写
wokoo-scripts的主要功能有:
- commander 获取shell中用户键入的projectName
- fs.writeFile创建文件路径
- 安装wokoo-template模板
- 读取模板指定后缀文件.md, .js,将ejs语法进行替换
- 删除多余内容
- 卸载模板
1.创建入口
进入packages/wokoo-scripts,创建bin/www文件
#! /usr/bin/env node

require('../index.js');
2
3
修改package.json,增加bin字段配置
 "bin": {
    "wokoo": "./bin/www"
  }
2
3
在wokoo-scripts下创建index.js文件作为项目入口。
2.安装依赖模块
介绍下用到的第三方模块:
chalk (opens new window) 粉笔,丰富控制台显示的字颜色
commander (opens new window) 解析命令行中的命令
inquirer (opens new window) 交互式命令行工具,有他就可以实现命令行的选择功能
metalsmith (opens new window) 读取所有文件,实现模板渲染
安装依赖,添加软链
npm install chalk cross-spawn commander fs-extra inquirer metalsmith consolidate ejs  -S
npm link
2
3.实现init方法,读取命令行指令
主要使用commander (opens new window)来读取命令行中用户输入的项目名,此时在命令行执行wokoo my-app,能够在代码中获取到项目名my-app
const chalk = require('chalk')
const spawn = require('cross-spawn')
const { Command } = require('commander')
const fs = require('fs-extra')
const path = require('path')
const inquirer = require('inquirer')
const packageJson = require('./package.json')

let program = new Command()
init()
// 程序入口,读取命令行脚本,获得项目名称
async function init() {
  let projectName
  program
    .version(packageJson.version)
    .arguments('<project-directory>') // 项目目录名 参数格式:<必选> [可选]
    .usage(`${chalk.green(`<project-directory>`)}`)
    .action((name) => {
      projectName = name
      console.log('projectName:', projectName)
    })
    .parse(process.argv) // [node路径,脚本路径,参数]
		await createApp(projectName)
}
2
3
4
5
6
7
8
9
10
11
12
13
14
15
16
17
18
19
20
21
22
23
24
4.createApp方法,根据项目名生成项目
在run方法中调createApp方法,传入projectName。createApp主要实现了创建文件夹,写入package.json的功能。
async function createApp(appName) {
  let root = path.resolve(appName) // 要生成的项目的绝对路径
  fs.ensureDirSync(appName) // 没有则创建文件夹
  console.log(`create a new app in ${chalk.green(root)}`)
  // 初始化package.json
  const packageJson = {
    name: appName,
    version: '0.0.1',
    private: true,
    scripts: {
      start: 'cross-env NODE_ENV=development webpack serve',
      build: 'webpack',
    },
  }
  // 写入package.json
  fs.writeFileSync(
    path.join(root, 'package.json'),
    JSON.stringify(packageJson, null, 2)
  )
  // 改变工作目录,进入项目目录
  process.chdir(root)
  await run(root, appName)
}
2
3
4
5
6
7
8
9
10
11
12
13
14
15
16
17
18
19
20
21
22
23
5. run:复制项目模板到当前项目下,生成基础项目
createApp最后要调用run方法。run主要做了以下几点👇:
- 安装wokoo-template
const templateName = 'wokoo-template' // 对应的wokoo模板
const allDependencies = [templateName]
// 安装wokoo-template包
console.log('Installing packages. This might take a couple of minutes')
console.log(`Installing ${chalk.cyan(templateName)} ...`)
try {
  await doAction(root, allDependencies)
} catch (e) {
  console.log(`Installing ${chalk.red(templateName)} failed ...`, e)
}
2
3
4
5
6
7
8
9
10
- 根据用户选择的模板类型复制相应模板文件到临时文件夹temp,替换其中的ejs模板,然后删除临时文件夹temp
// 选择模板
  const repos = ['vue', 'react']
  const { targetTemplate } = await inquirer.prompt({
    name: 'targetTemplate',
    type: 'list',
    message: 'which template do you prefer?',
    choices: repos, // 选择模式
  })

  const templatePath = path.dirname(
    require.resolve(`${templateName}/package.json`, { paths: [root] })
  )

  // 复制文件到项目目录
  const scriptsConfigDir = path.join(templatePath, 'webpack.config.js')
  const gitIgnoreDir = path.join(templatePath, '.npmignore')
  const publicDir = path.join(templatePath, 'public')
  const tempDir = path.join(root, 'temp') // 临时模板路径
  const templateDir = path.join(templatePath, `${targetTemplate}-template`)
  // 从wokoo-template中拷贝模板到项目目录
  if (fs.existsSync(templatePath)) {
    // 将templateDir内模板拷贝到temp文件,并修改模板文件中的ejs配置项
    await modifyTemplate(templateDir, 'temp', {
      projectName: appName,
      basicProject: targetTemplate,
    })

    fs.copySync(tempDir, root) // 源 目标
    fs.copySync(publicDir, root + '/public')
    fs.copyFileSync(scriptsConfigDir, root + '/webpack.config.js')
    fs.copyFileSync(gitIgnoreDir, root + '/.gitignore')
    deleteFolder(tempDir)
  } else {
    console.error(
      `Could not locate supplied template: ${chalk.green(templatePath)}`
    )
    return
  }
2
3
4
5
6
7
8
9
10
11
12
13
14
15
16
17
18
19
20
21
22
23
24
25
26
27
28
29
30
31
32
33
34
35
36
37
38
此处,我将复制的功能封装到modifyTemplate.js中。利用MetalSmith提供的方法遍历源路径下文件,利用consolidate.ejs将文件中的ejs语法替换后,将内容写入新的临时文件夹temp中。
const MetalSmith = require('metalsmith') // 遍历文件夹
let { render } = require('consolidate').ejs
const { promisify } = require('util')
const path = require('path')
render = promisify(render) // 包装渲染方法

/**
 *
 * @param {*} fromPath 源路径
 * @param {*} toPath 目标路径
 */
async function handleTemplate(fromPath, toPath, config) {
  await new Promise((resovle, reject) => {
    MetalSmith(__dirname)
      .source(fromPath) // 遍历下载的目录
      .destination(path.join(path.resolve(), toPath)) // 输出渲染后的结果
      .use(async (files, metal, done) => {
        // result 替换模板内数据
        let result = {
          license: 'MIT',
          version: '0.0.1',
          ...config,
        }
        const data = metal.metadata()
        Object.assign(data, result) // 将询问的结果放到metadata中保证在下一个中间件中可以获取到
        done()
      })
      .use((files, metal, done) => {
        Reflect.ownKeys(files).forEach(async (file) => {
          let content = files[file].contents.toString() // 获取文件中的内容
          if (
            file.includes('.js') ||
            file.includes('.json') ||
            file.includes('.txt') ||
            file.includes('.md')
          ) {
            // 如果是md或者txt才有可能是模板
            if (content.includes('<%')) {
              // 文件中用<% 我才需要编译
              content = await render(content, metal.metadata()) // 用数据渲染模板
              files[file].contents = Buffer.from(content) // 渲染好的结果替换即可
            }
          }
        })
        done()
      })
      .build((err) => {
        // 执行中间件
        if (!err) {
          resovle()
        } else {
          reject(err)
        }
      })
  })
}

module.exports = handleTemplate
2
3
4
5
6
7
8
9
10
11
12
13
14
15
16
17
18
19
20
21
22
23
24
25
26
27
28
29
30
31
32
33
34
35
36
37
38
39
40
41
42
43
44
45
46
47
48
49
50
51
52
53
54
55
56
57
58
- 合并template.json和package.json,生成新的package.json并再次执行
npm install
// 合并template.json和package.json
  let tempPkg = fs.readFileSync(root + '/template.json').toString()
  let pkg = fs.readFileSync(root + '/package.json').toString()
  const tempPkgJson = JSON.parse(tempPkg)
  const pkgJson = JSON.parse(pkg)

  pkgJson.dependencies = {
    ...pkgJson.dependencies,
    ...tempPkgJson.package.dependencies,
  }
  pkgJson.devDependencies = {
    ...tempPkgJson.package.devDependencies,
  }
  // 编写package.json
  fs.writeFileSync(
    path.join(root, 'package.json'),
    JSON.stringify(pkgJson, null, 2)
  )
  fs.unlinkSync(path.join(root, 'template.json')) // 删除template.json文件

  // 再次根据dependenciesToInstall执行npm install
  const dependenciesToInstall = Object.entries({
    ...pkgJson.dependencies,
    ...pkgJson.devDependencies,
  })
  let newDependencies = []
  if (dependenciesToInstall.length) {
    newDependencies = newDependencies.concat(
      dependenciesToInstall.map(([dependency, version]) => {
        return `${dependency}@${version}`
      })
    )
  }
  await doAction(root, newDependencies)
  console.log(`${chalk.cyan('Installing succeed!')}`)
2
3
4
5
6
7
8
9
10
11
12
13
14
15
16
17
18
19
20
21
22
23
24
25
26
27
28
29
30
31
32
33
34
35
卸载wokoo-template
await doAction(root, 'wokoo-template', 'uninstall')1
流程上的实现介绍完了,下面两个方法是我封装的功能性方法
doAction:使用npm安装或卸载项目依赖
使用cross-spawn (opens new window)开启子线程,在子线程中执行npm install 或 npm uninstall的命令
async function doAction(root, allDependencies, action = 'install') {
  typeof allDependencies === 'string'
    ? (allDependencies = [allDependencies])
    : null
  return new Promise((resolve) => {
    const command = 'npm'
    const args = [
      action,
      '--save',
      '--save-exact',
      '--loglevel',
      'error',
      ...allDependencies,
      '--cwd',
      root,
    ]
    const child = spawn(command, args, { stdio: 'inherit' })
    child.on('close', resolve) // 安装成功后触发resolve
  })
}
2
3
4
5
6
7
8
9
10
11
12
13
14
15
16
17
18
19
20
21
deleteFolder: 递归删除文件、文件夹,入参是path文件路径
function deleteFolder(path) {
  let files = []
  if (fs.existsSync(path)) {
    if (!fs.statSync(path).isDirectory()) {
      // path是文件,直接删除
      fs.unlinkSync(path)
    } else {
      // 删除文件夹
      files = fs.readdirSync(path)
      files.forEach(function (file) {
        let curPath = path + '/' + file
        deleteFolder(curPath)
      })
      fs.rmdirSync(path)
    }
  }
}
2
3
4
5
6
7
8
9
10
11
12
13
14
15
16
17
# wokoo-template编写
- 分为vue-template和react-template
- vue-template和react-template分别对应webpack配置的一个vue或react基础项目
- 使用ejs模板,实现wokoo-scripts注入变量
template相对来说比较简单,使用webpack+vue或react分别搭建了一个轻量级项目。
具体代码可看👉wokoo/wokoo-template (opens new window)
# 发布wokoo
在执行lerna publish之前,先看下自己的项目下用到的文件或文件夹是否在package.json files字段中。只有在files中的文件或文件夹才会真正的被发布上去。
- 在wokoo-scripts的package.json的
files字段中增加"modifyTemplate.js" - 在wokoo-template的package.json的
files字段中增加"react-template", "vue-template","public","webpack.config.js",".gitignore"
我之前就忘记往files字段添加,导致publish上去后发现丢文件了。具有问题可阅读:https://stackoverflow.com/questions/27049192/npm-publish-isnt-including-all-my-files
最后一步就大功告成了!🎉
lerna publish
# wokoo使用
具体使用过程可以阅读油猴脚手架wokoo使用说明 (opens new window)
# 1.1 项目安装 & 初始化配置
npm i wokoo -g
wokoo zhihu-help
2
选择模板
- [ ] vue
- [ ] react
这里选择react,等待项目安装。项目安装完成后,根据提示执行下命令:
cd zhihu-helper
npm start
2
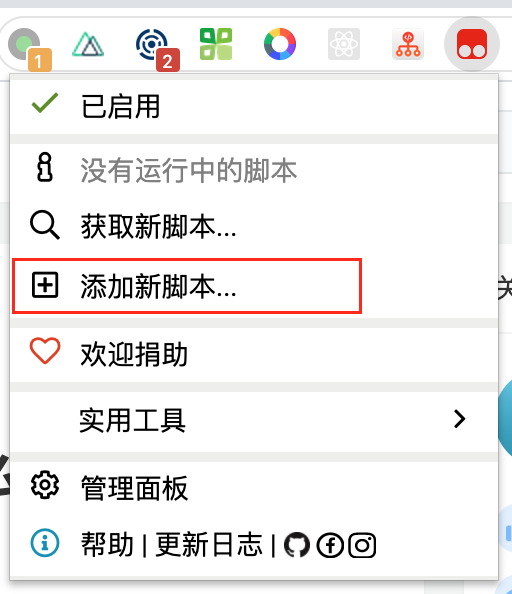
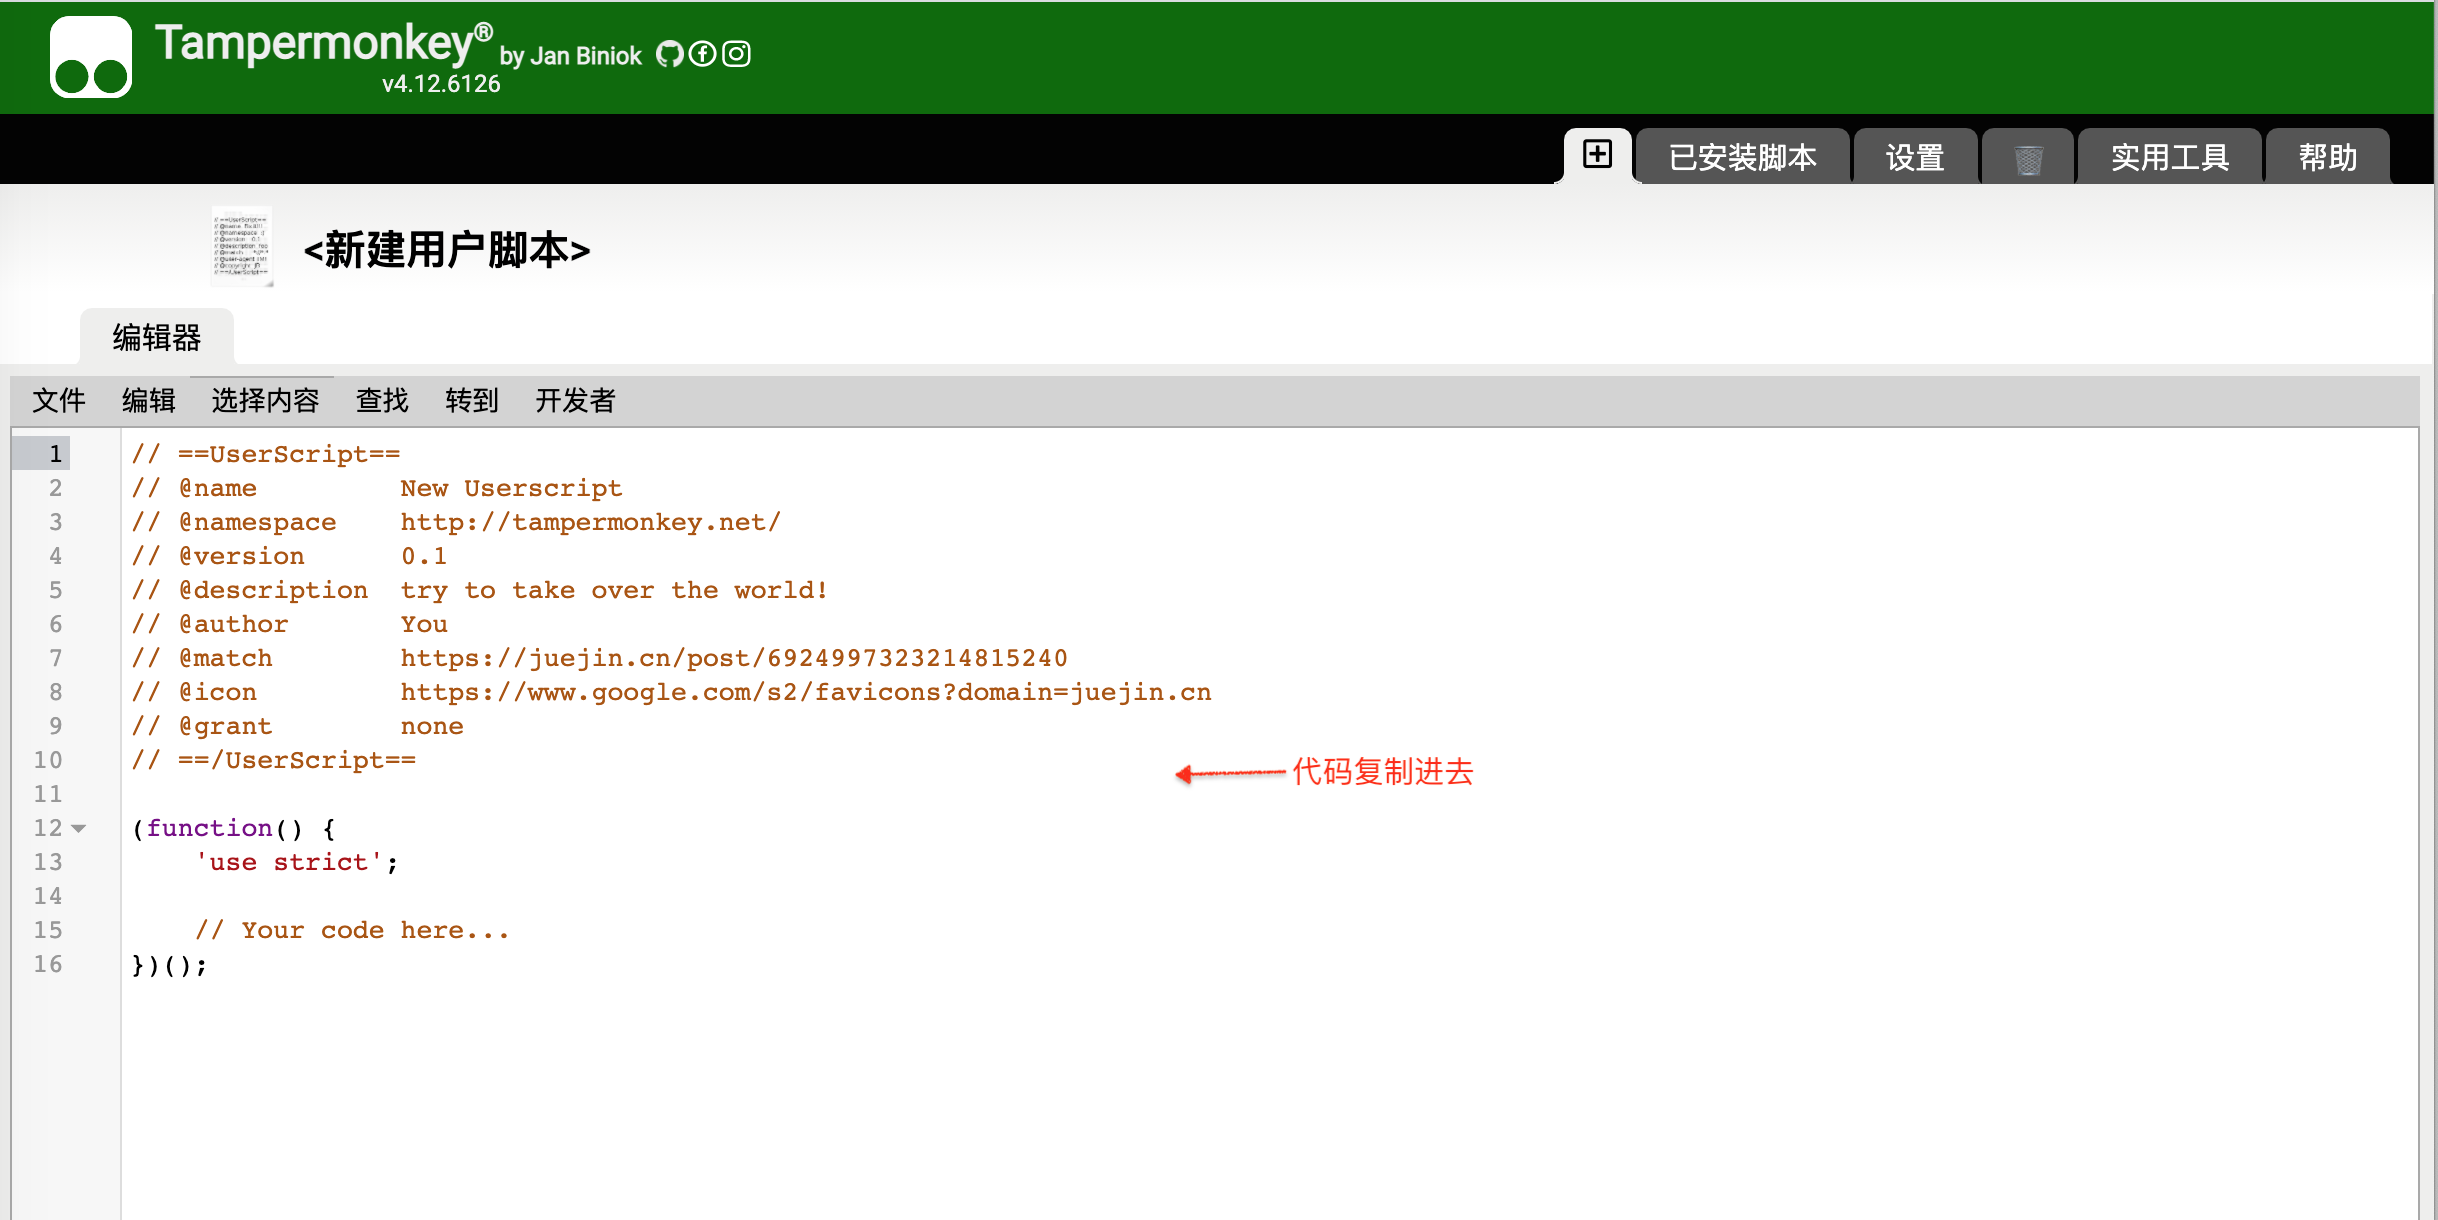
- 打开油猴脚本编辑器,把tampermonkey.js的内容复制进去。
- 打开网页知乎专栏 (opens new window),右上角出现一只猴子图标,说明项目已跑通。
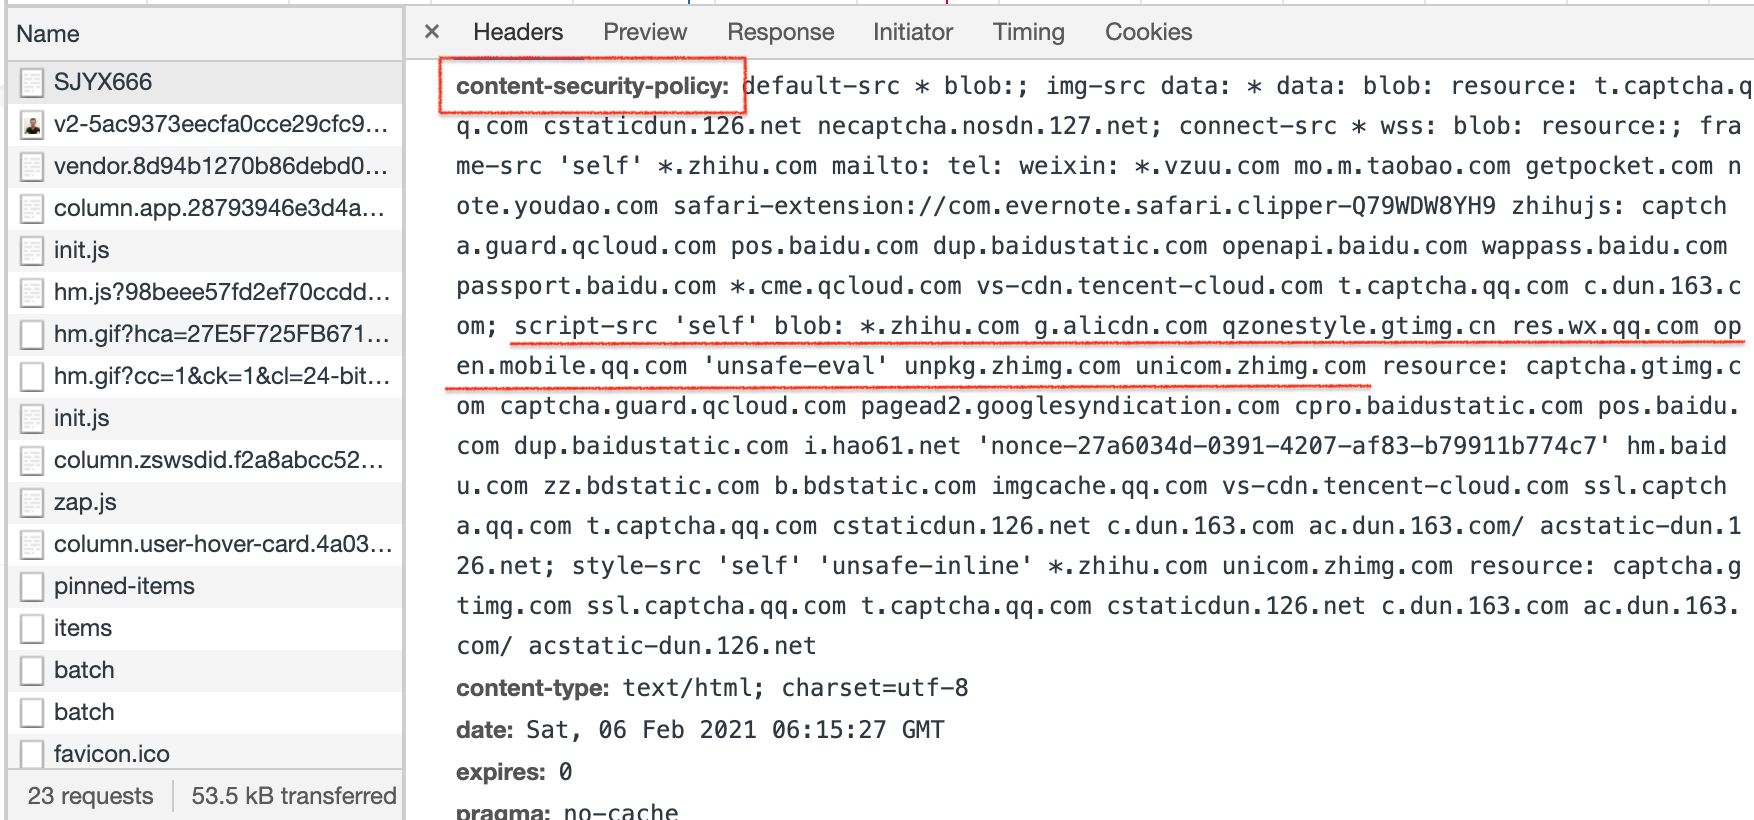
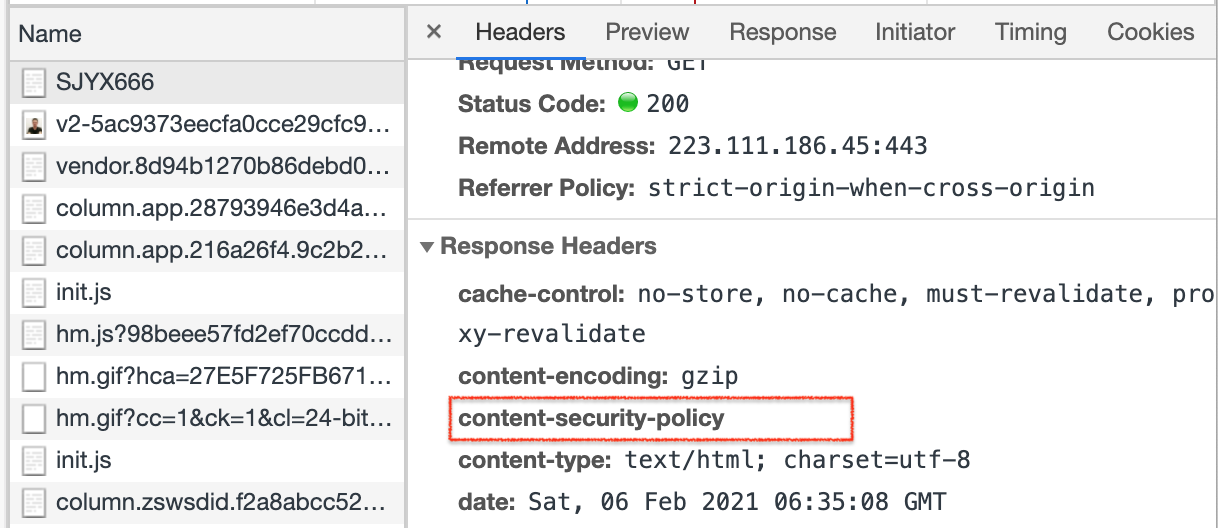
补充说明
此处有的浏览器不会出现猴子图标。打开控制台可见报错:
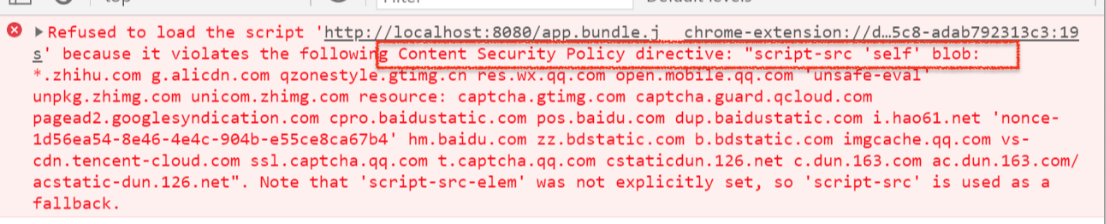
原因是知乎使用了csp内容安全策略,只允许加载指定域名的js。具体情况可阅读 👉 内容安全策略( CSP ) (opens new window)
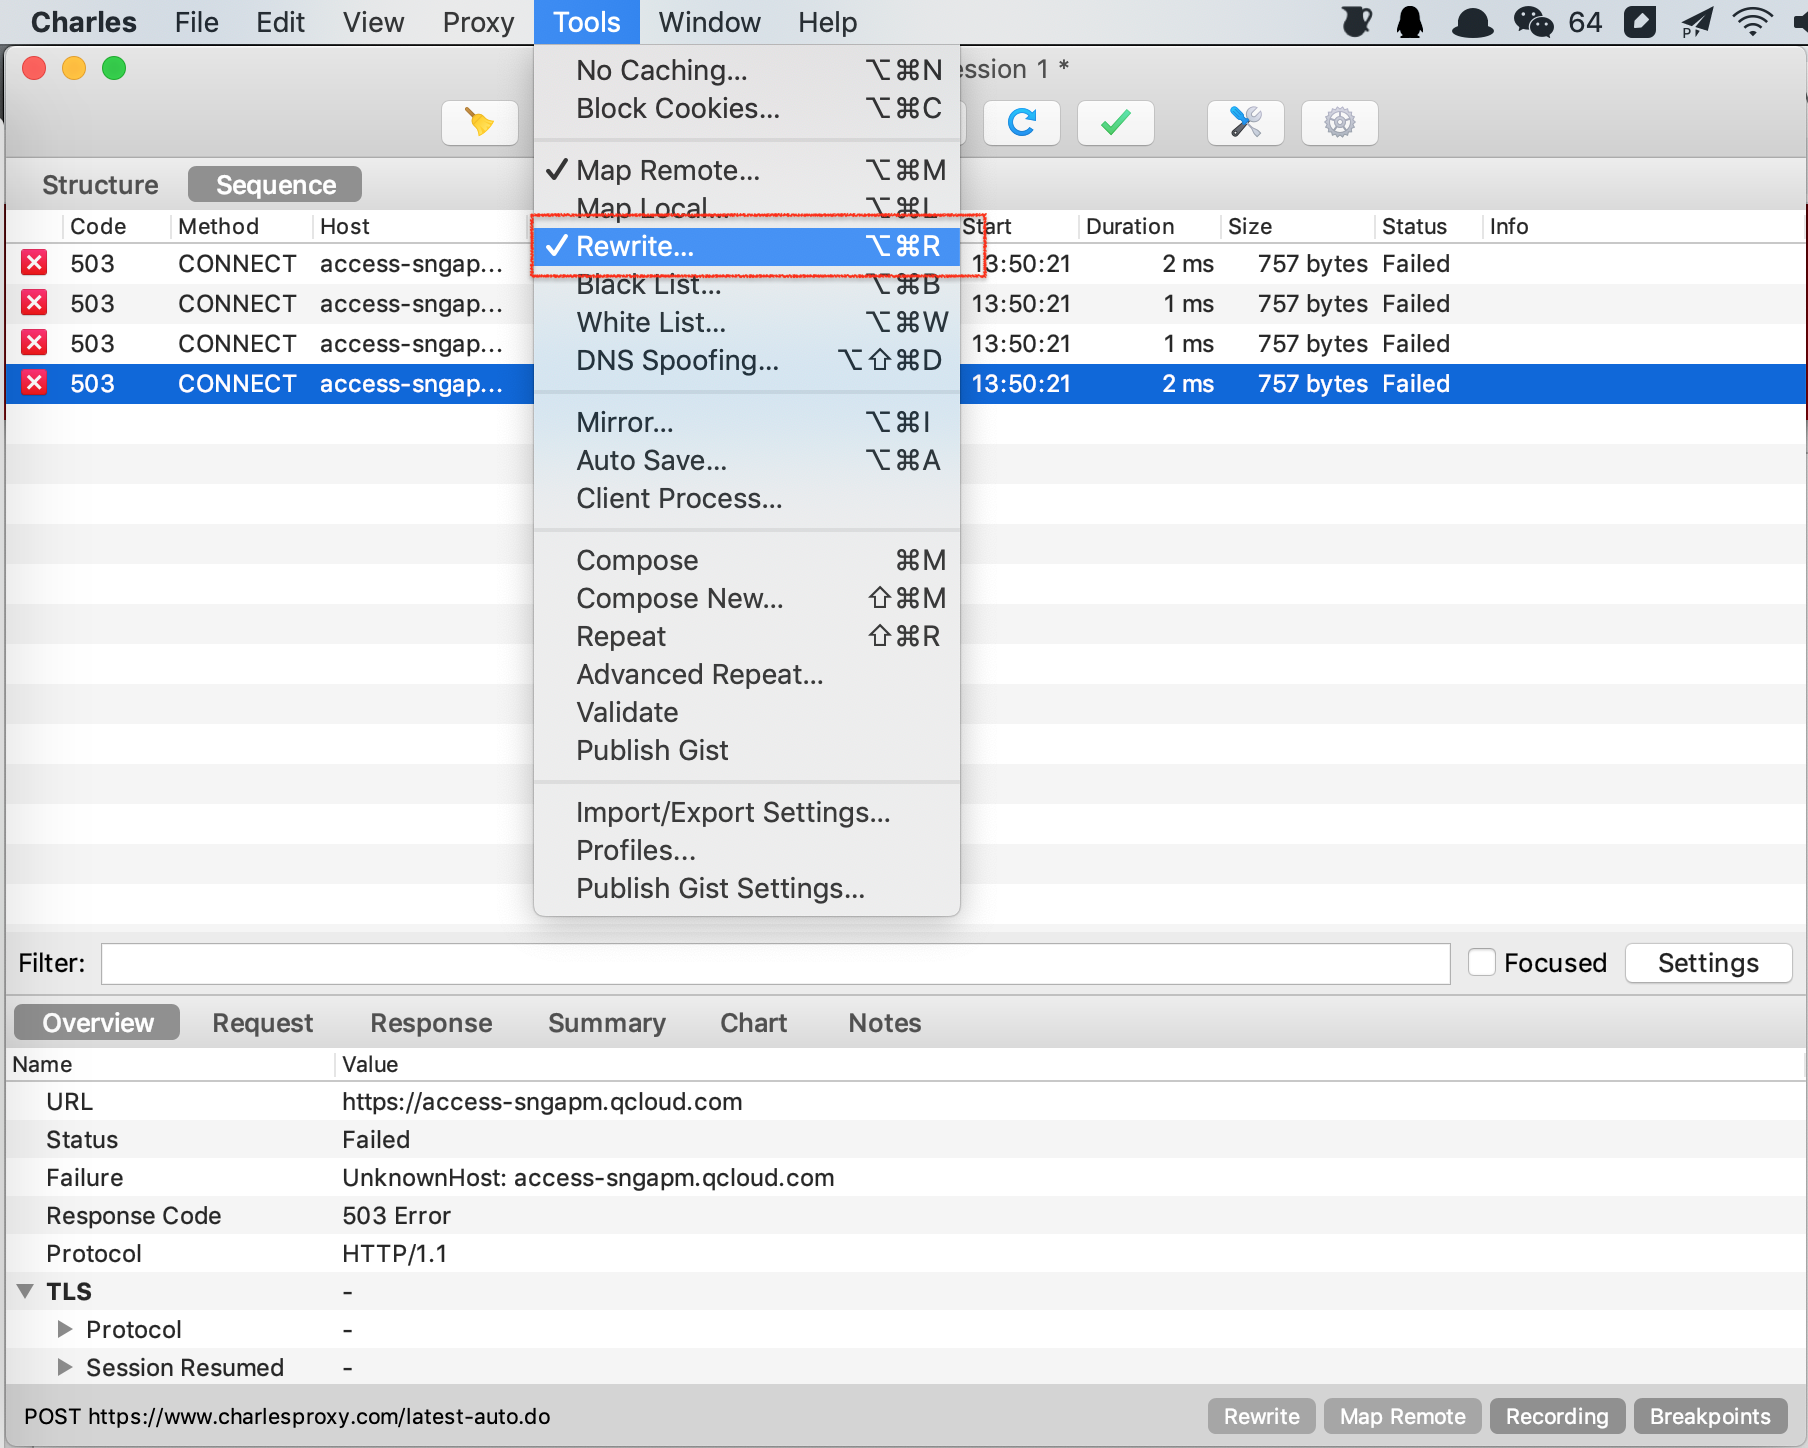
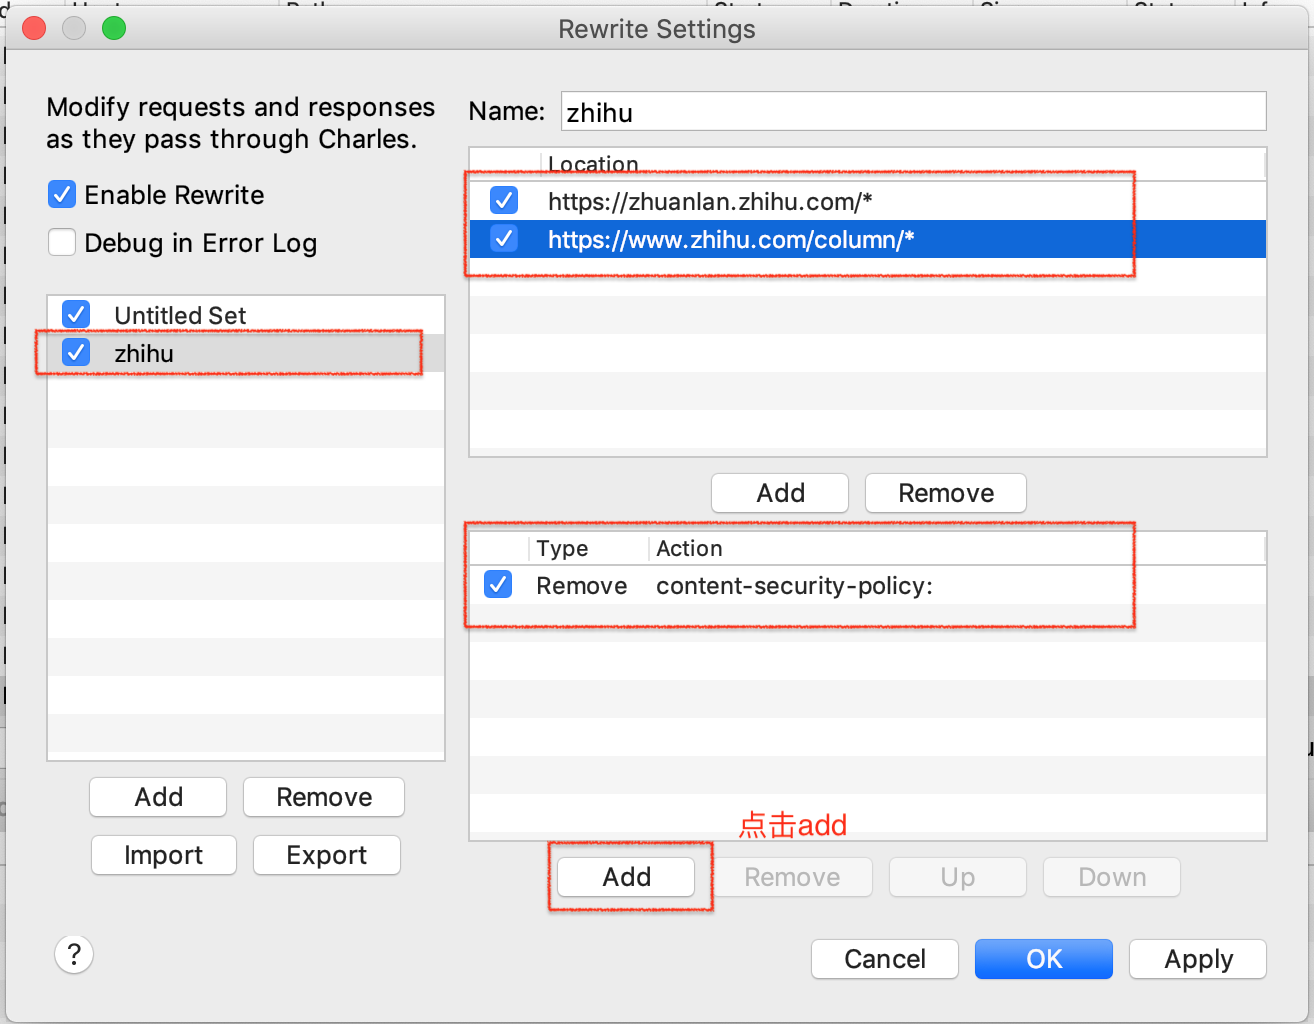
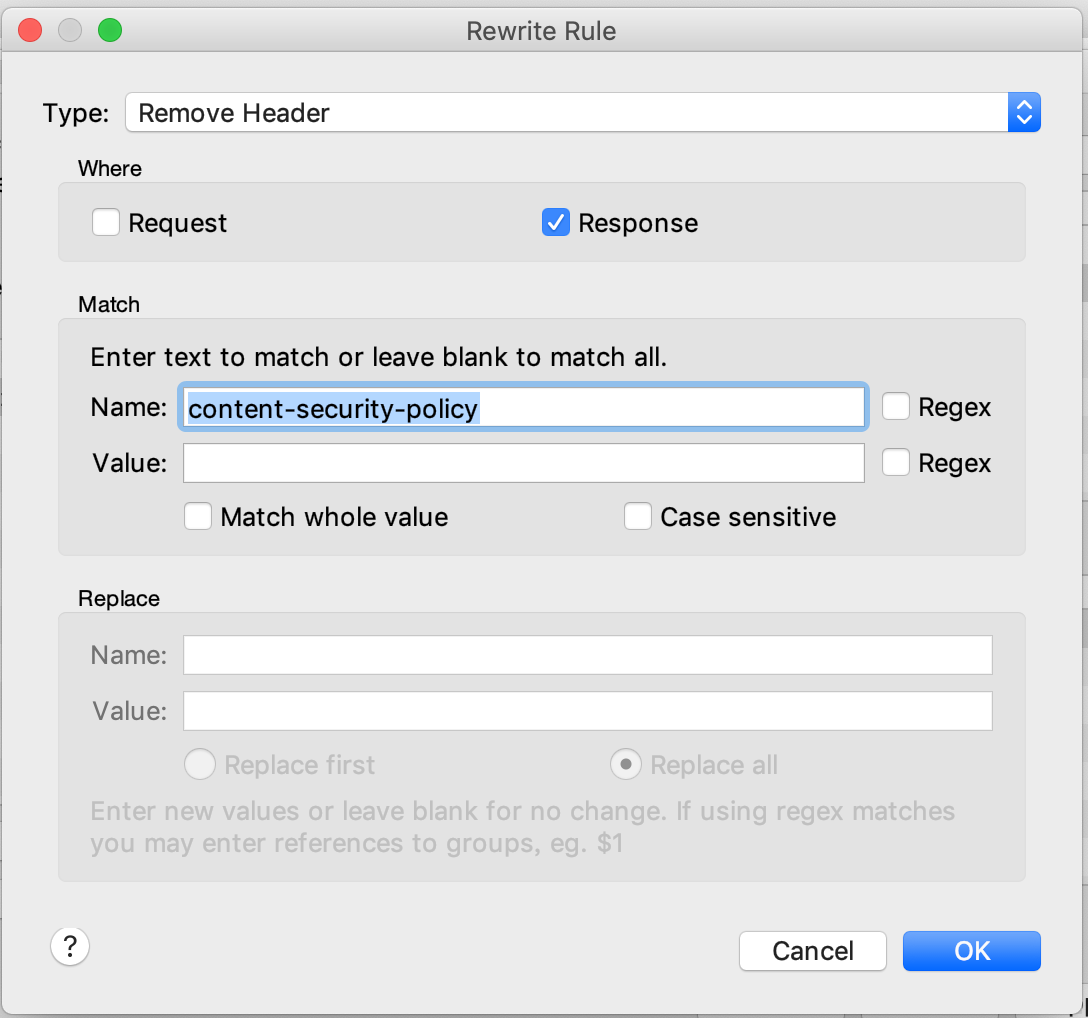
如何绕过此安全策略,此处给两个方法:
- 安装插件Disable Content-Security-Policy (opens new window), 在调试知乎页面时开启插件,自动把content-security-policy给设置为空。
- 会配置charles的同学,可以设置一条转发规则
这两种方法都可以绕过安全策略。
遇到这中csp内容安全策略的网页,在上线到油猴商店的时候不能用托管cdn的方式,要将代码复制到编辑框中。
# 1.2 开发基本功能
整理思路
- 绘制左侧抽屉弹窗
- 弹窗弹出时请求知乎列表接口,拿到列表数据
- 下拉时实现加载更多的功能
下面我们来逐步实现吧~
步骤1. 绘制左侧抽屉弹窗
主要通过this.state.show控制弹窗的显示隐藏。此步骤挺简单的,可以直接看代码:step1 (opens new window),可以将index.js入口里的app替换成step1查看效果。
步骤2. 请求知乎列表 (opens new window)接口,获取列表数据
- 安装axios,并引入
npm install axios
- 计算请求参数
分析请求的url可知,请求接口为:
`https://www.zhihu.com/api/v4/columns${this.queryName}/items?limit=20&offset=${offset}`
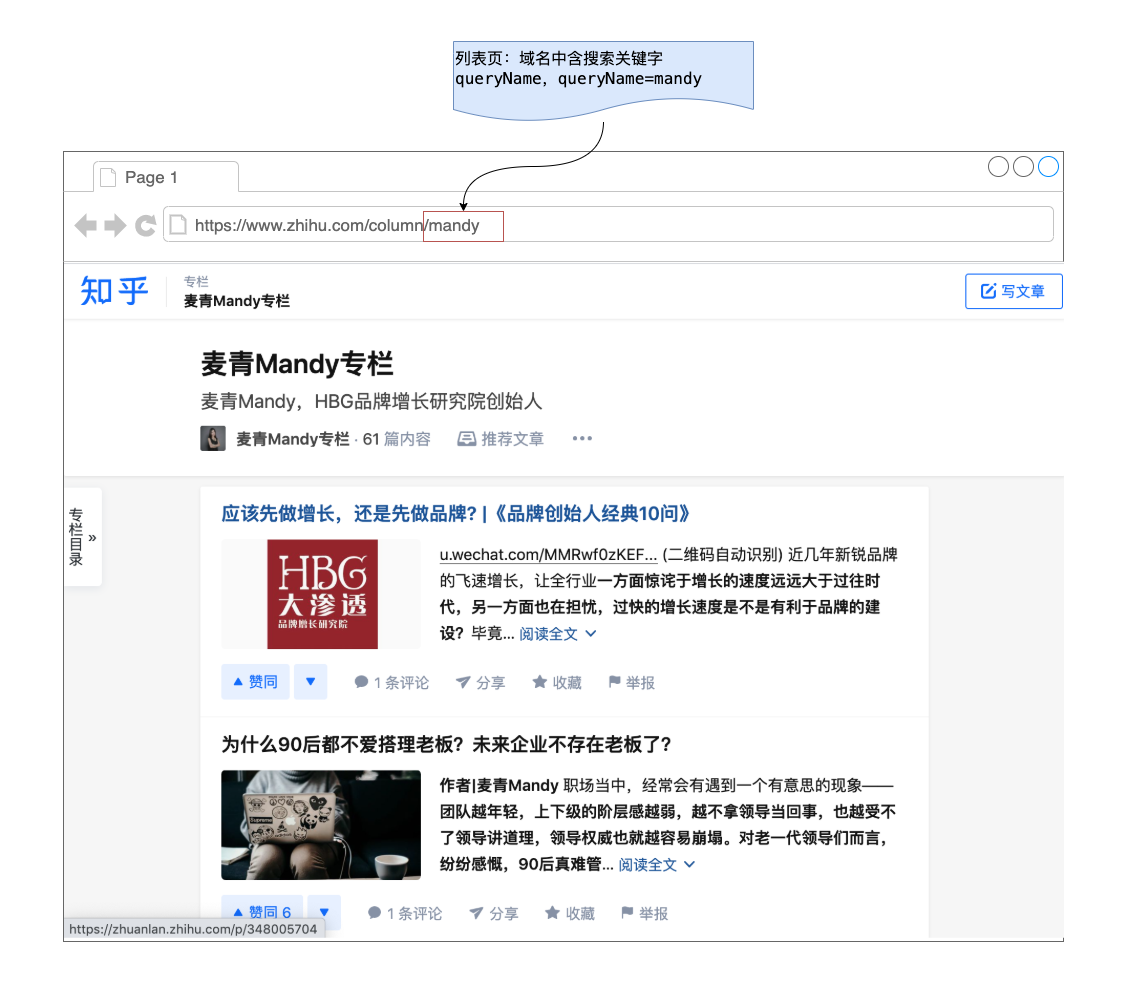
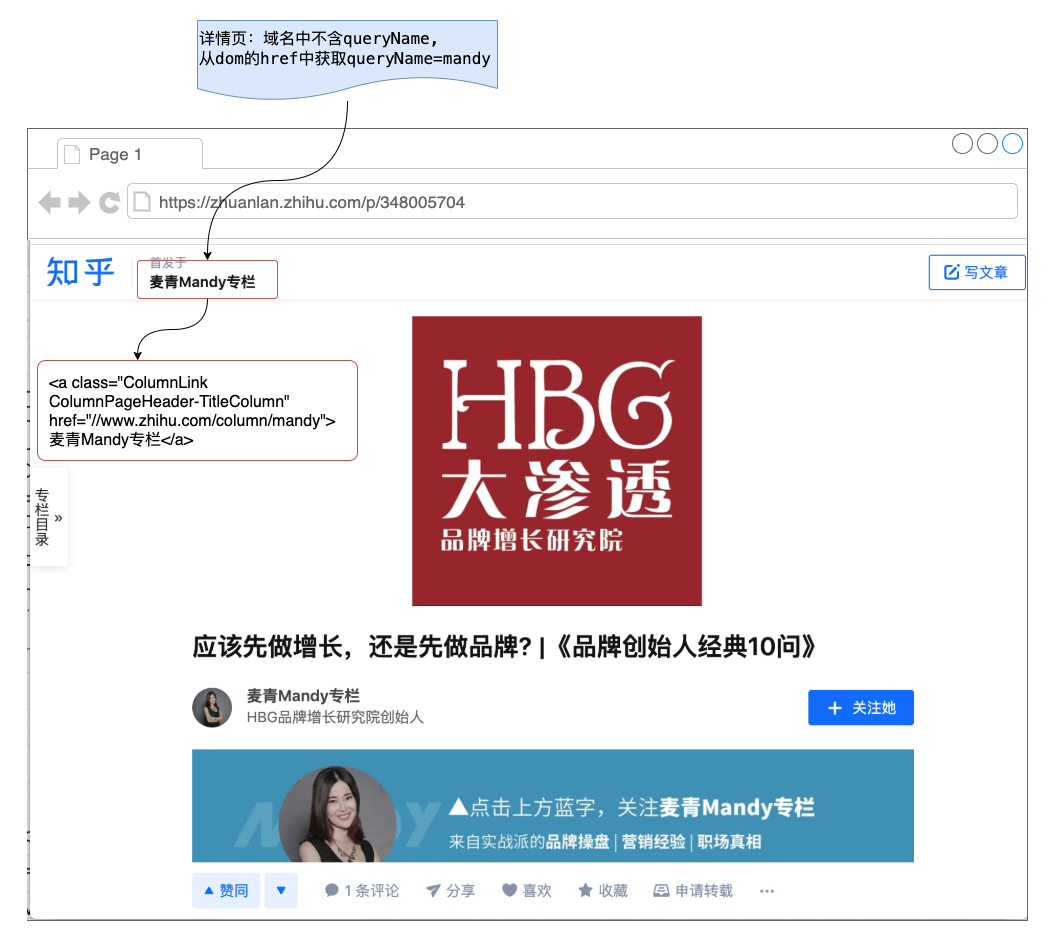
其中this.queryName是专栏名称,当页面为专栏列表页 (opens new window)时就是pathname; 当页面为专栏详情页 (opens new window)时,需要通过类名为ColumnPageHeader-TitleColumn的a标签的href来获取。
通过这两张图应该更好理解getQueryName方法
getQueryName = () => {
    let pathname = location.pathname
    let detailRegExp = /^\/p\/\d+/
    let queryName = ''
    // 专栏详情页
    if (detailRegExp.test(pathname)) {
      let aTage = document.getElementsByClassName(
        'ColumnPageHeader-TitleColumn'
      )
      let url = aTage[0].href
      queryName = url.slice(url.lastIndexOf('/'))
    } else {
      // 专栏列表页
      // http://zhuanlan.zhihu和http://zhihu/column两种情况都是专栏
      if (pathname.indexOf('/column') === 0) {
        pathname = pathname.slice('/column'.length)
      }
      queryName = pathname
    }
    this.queryName = queryName
  }
2
3
4
5
6
7
8
9
10
11
12
13
14
15
16
17
18
19
20
21
而列表页又存在两种域名:https://www.zhihu.com/column/mandy 和 https://zhuanlan.zhihu.com/mandy 所以在else逻辑里针对https://www.zhihu.com/column/mandy做了处理,只保留/mandy
通过getQueryName方法,我们获取到了请求参数
- 发送请求,拉取目录列表
getList = async () => {
    if (!this.state.hasMore) return
    let { offset } = this.state
    let { data } = await axios.get(
      `https://www.zhihu.com/api/v4/columns${this.queryName}/items?limit=20&offset=${offset}`
    )
    let list = data.data.map((i) => ({
      title: i.title,
      url: i.url,
      id: i.id,
      commentCount: i.comment_count,
      voteupCount: i.voteup_count,
    }))
    if (data.paging.is_end) {
      this.setState({ hasMore: false })
    }
    offset += limit

    this.setState({
      list: [...this.state.list, ...list],
      offset,
    })
  }
2
3
4
5
6
7
8
9
10
11
12
13
14
15
16
17
18
19
20
21
22
23
第二步的过程实现完了,代码在这里👉step2 (opens new window) ,可以将index.js入口里的app替换成step2查看效果。
这时插件的效果是这样的,除了没有下拉加载功能,其他基本完工了。

步骤3. 下拉时实现加载更多的功能
无限滚动的组件引了第三方库react-infinite-scroll-component (opens new window):
npm install react-infinite-scroll-component
主要是在render函数里增加InfiniteScroll组件,注意InfiniteScroll的height需要通过计算给一个固定的值,否则无法触发滚动。
<ul className="list-ul" onMouseLeave={this.handleMouseLeave}>
  <InfiniteScroll
		dataLength={list.length}
		next={this.handleInfiniteOnLoad}
		hasMore={hasMore}
		loader={<h4>Loading...</h4>}
    height={document.documentElement.clientHeight - 53}
		endMessage={
  		<p style={{ textAlign: 'center' }}>
    		<b>到底了,没内容啦~</b>
			</p>
		}
  >
    {list.map((i) => (
      <li className="list-li" key={i.id}>
      ...
      </li>
))}
  </InfiniteScroll>
</ul>
2
3
4
5
6
7
8
9
10
11
12
13
14
15
16
17
18
19
20
此时功能已经开发完成,具体代码查看 👉app.js (opens new window)
# 三、部署插件到油猴商店
3.1 构建
执行命令
npm run build
3.2 确认油猴脚本文件tampermonkey.js
此文件中被注释掉的//@xxx 都有含义,可以对应着 tampermonkey开发文档 (opens new window) 理解。
@description 插件描述
@match 指定某些域名下开启此插件,默认配了两条,
// @match https://*/*和// @match https://*/*表示在所有域名下都开启。但是此处希望只在zhihu专栏里使用此插件,所以要修改@math字段。// @match https://zhuanlan.zhihu.com/* // @match https://www.zhihu.com/column/*1
2@require 油猴脚本内部帮忙引入第三方资源,比如jquery,react等。
// @require https://unpkg.com/react@17/umd/react.production.min.js
// @require https://unpkg.com/react-dom@17/umd/react-dom.production.min.js
1
2
3.3 发布插件到油猴市场
发布油猴市场的优点是不用审核,即发即用,非常方便。
- 将/dist/app.bundle.js 文件部署到 cdn 上,获取到对应 url。
注意:
js文件可放到 github 上,如果托管到 github 上最好做 cdn 加速(我使用cdn.jsdelivr.net进行cdn加速)。
如果没有cdn服务器可跳过此步骤,在步骤4直接将app.bundle.js复制到油猴脚本编辑器中
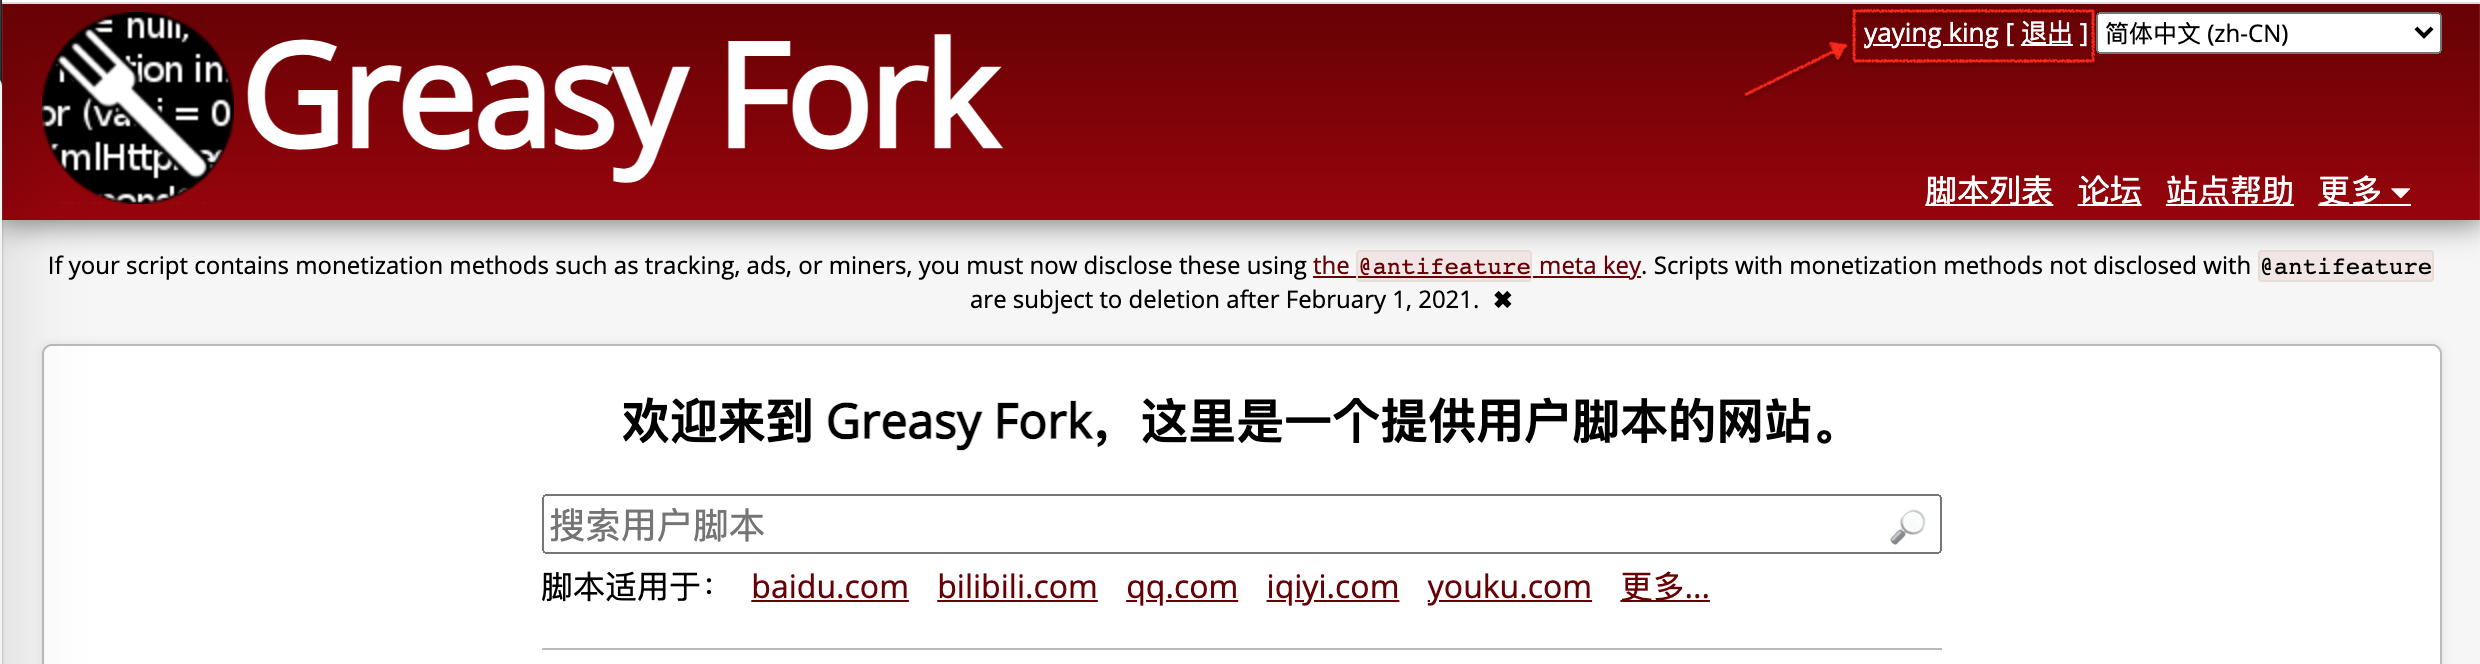
登录油猴市场 (opens new window),谷歌账号或 github 账号都可使用。
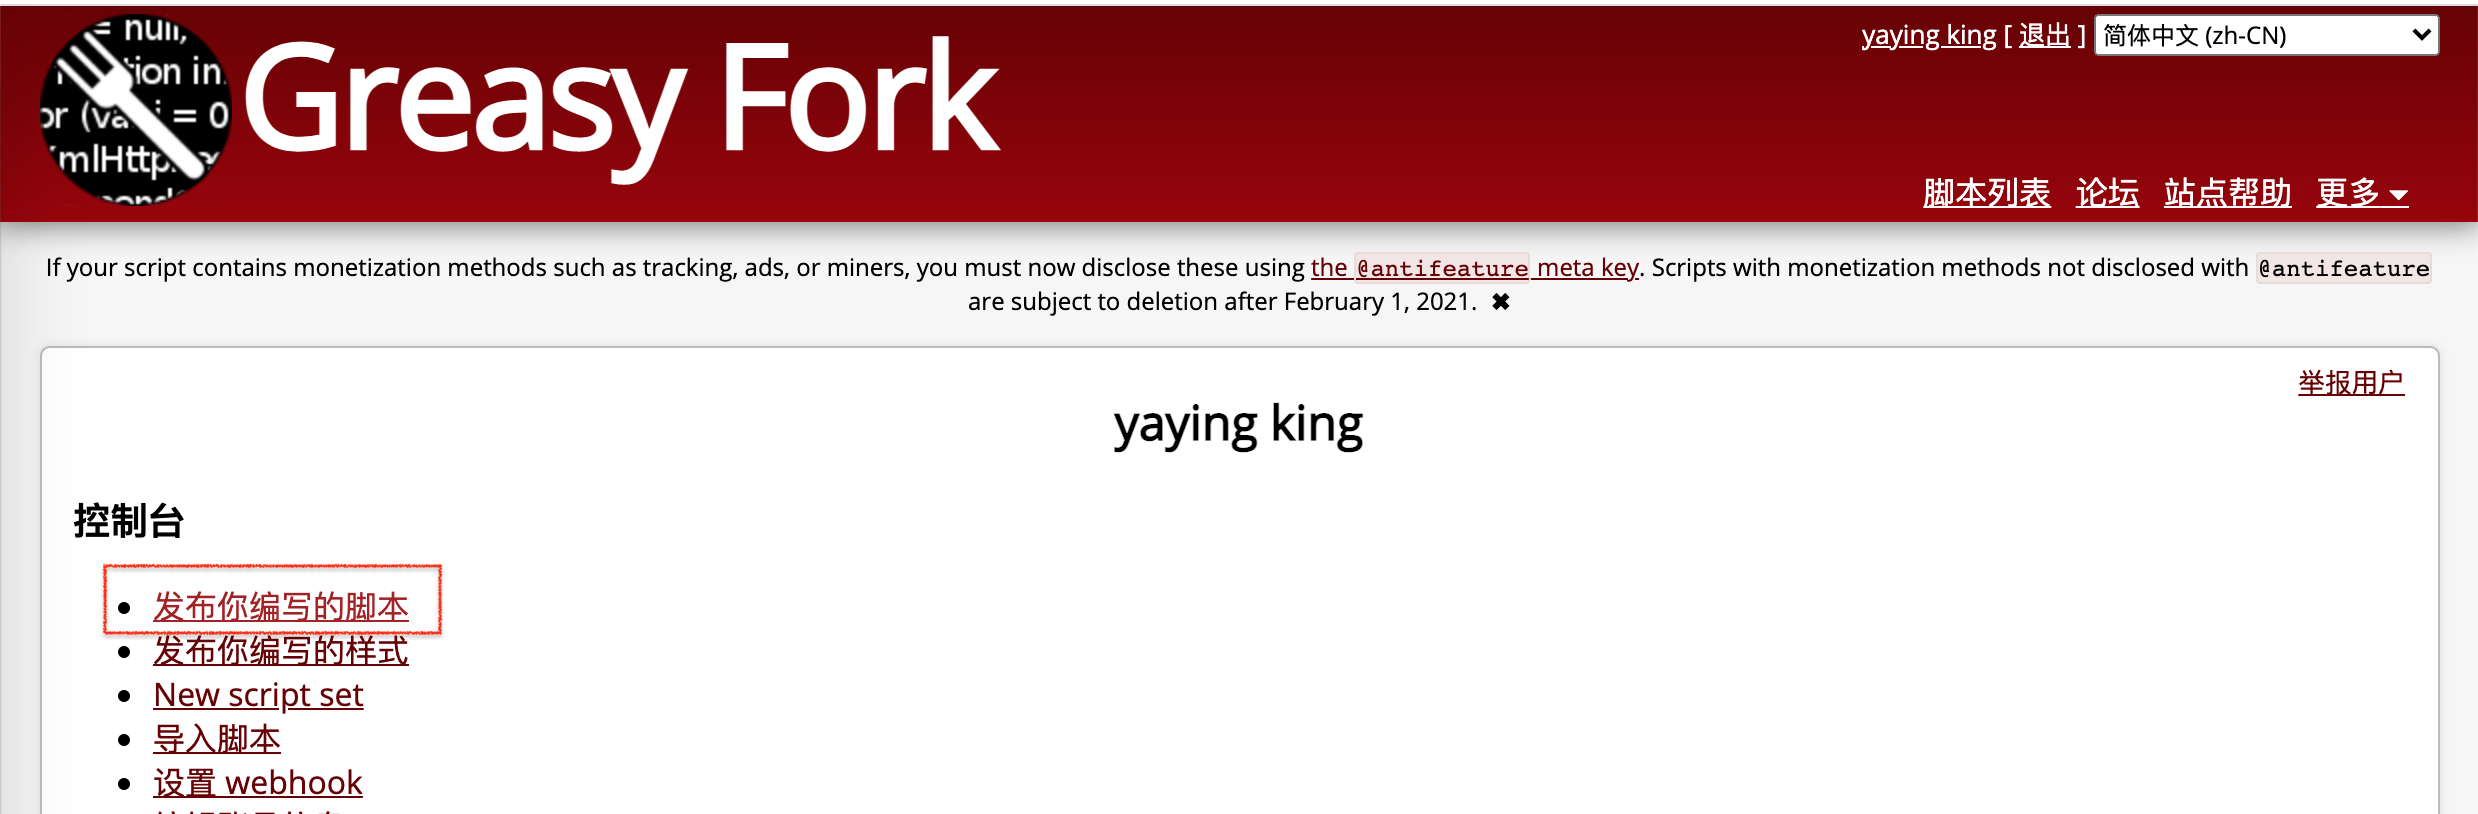
点击账号名称,再点击「发布你编写的脚本」
进入编辑页,将 tampermonkey.js 里的内容复制到编辑框中
注意:
步骤1中如果托管了cdn,需要将代码中的
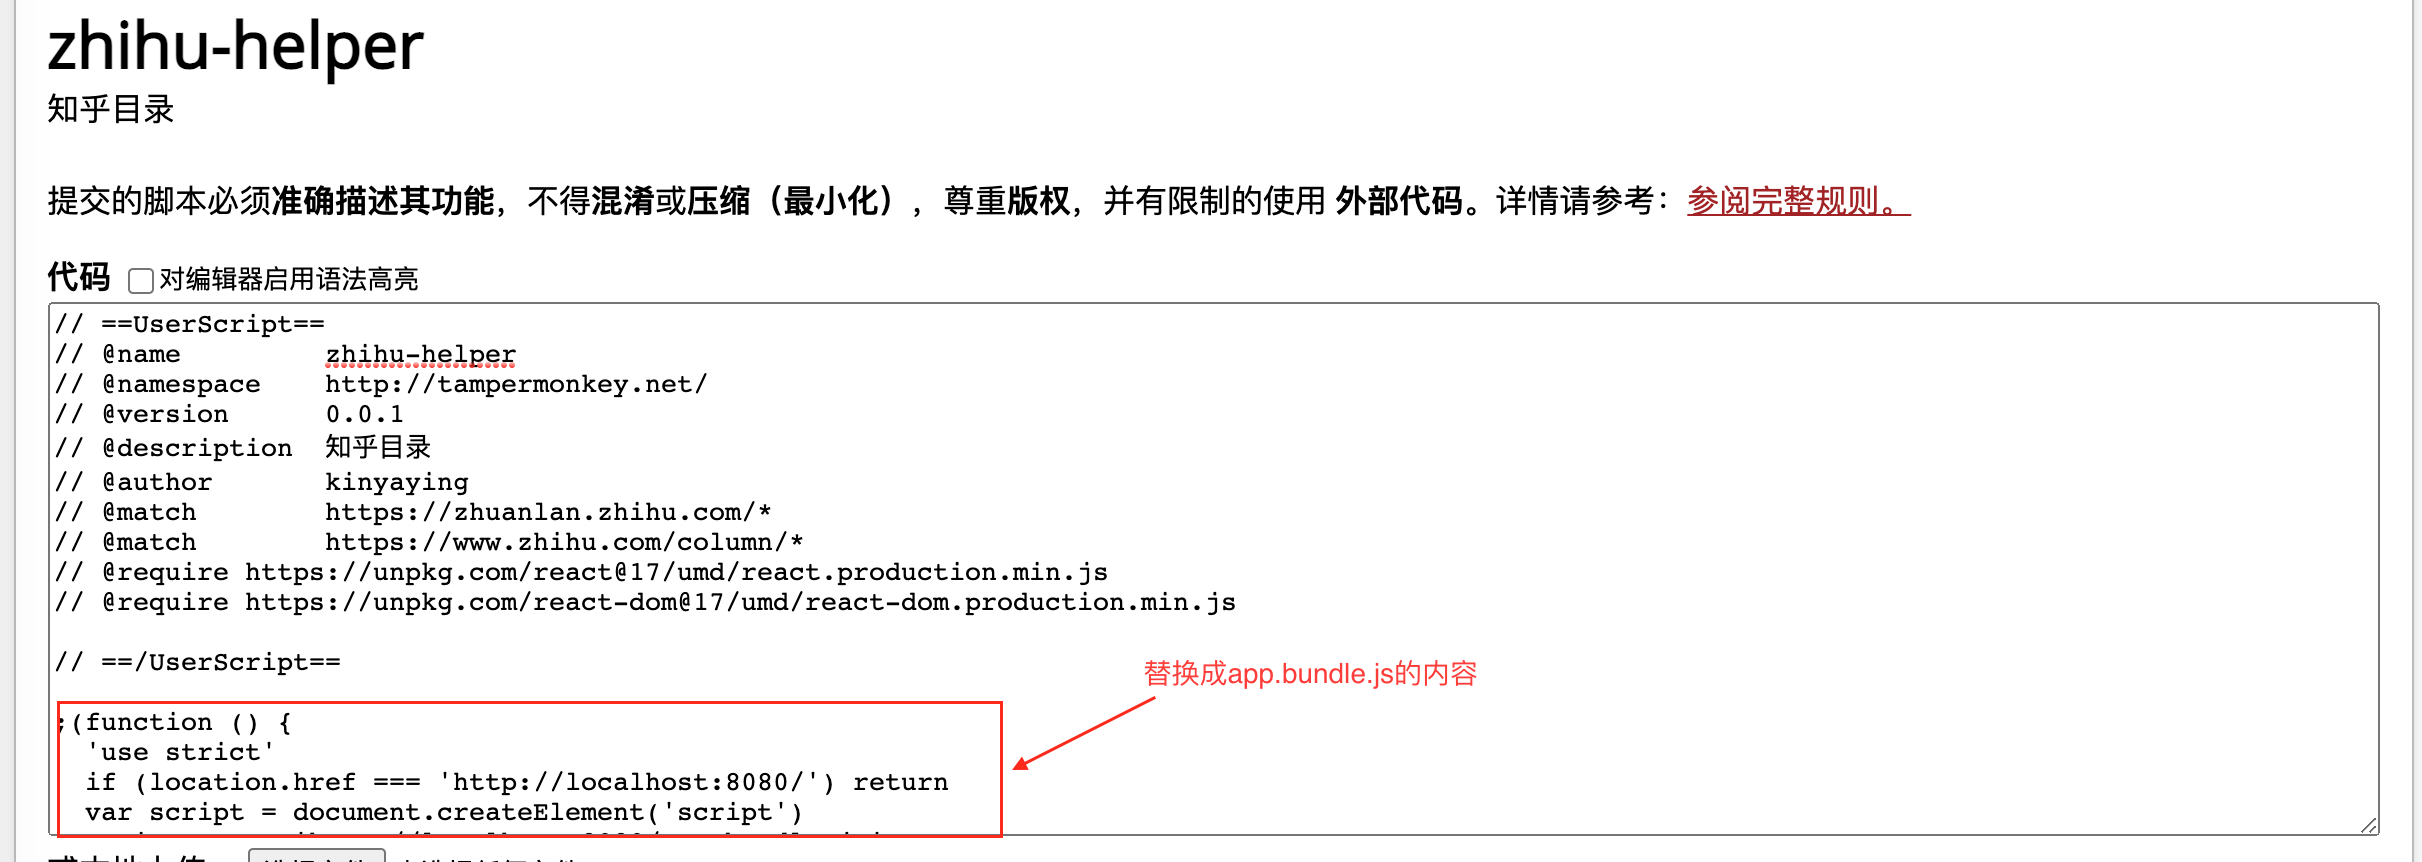
localhost:8080网址替换成静态资源 url步骤1中没有托管cdn,不能直接将/dist/app.bundle.js文件里的内容复制编辑框。因为编辑框内代码有最大限制,我们构建的app.bundle.js把react等三方库构建进去超过最大限制了。
需要对构建结果进行拆包
4.1 修改 tampermonkey.js ,通过@require方式引入react和react-dom
// ==UserScript==
// @name         zhihu-helper
// @namespace    http://tampermonkey.net/
// @version      0.0.1
// @description  知乎目录
// @author       xx
// @match        https://zhuanlan.zhihu.com/*
// @match        https://www.zhihu.com/column/*
// @require https://unpkg.com/react@17/umd/react.production.min.js
// @require https://unpkg.com/react-dom@17/umd/react-dom.production.min.js

// ==/UserScript==

// app.bundle.js构建好的代码
1
2
3
4
5
6
7
8
9
10
11
12
13
144.2 修改webpack.config.base.js的entry字段
entry: {
    app: '/src/index.js',
    vendor: [
      // 将react和react-dom这些单独打包出来,减小打包文件体积
      'react',
      'react-dom',
    ],
  },
1
2
3
4
5
6
7
84.3 重新执行
npm run build构建出新的app.bundle.js,复制到油猴市场的编辑框内。
- 点击 「发布脚本」即可