This historical scaffolding example targets Tampermonkey userscripts rather than Chrome Manifest V3 extensions. It retains CommonJS syntax; choose compatible major versions for packages such as Chalk and Inquirer instead of substituting current ESM-only releases. This is the process of others developing chrome plug-ins, original article address
Get started developing browser plug-ins in 5 minutes - Oil Monkey Scaffolding wokoo (Usage)Found on Zhihu
About the userscript scaffold
If you directly develop the Grease Monkey plug-in, developers need to spend time building Vue or React basic projects, and also need to configure the Grease Monkey script area accordingly, resulting in a poor development experience.
Wokoo can generate basic projects with one click and provide basic Tampermonkey configuration.
The main functions provided are:
- Create initial scaffolding project using command line
- Based on user selection, generate basic projects of vue and react
- Tampermonkey configuration is provided in the tampermonkey.js file
For the specific use of the Oil Monkey plug-in and wokoo, you can read Get started developing browser plug-ins in 5 minutes - Oil Monkey Scaffolding Wokoo
Here is the wokoo scaffolding code: wokoo scaffolding github repository
Use wokoo to develop MoveSearch (word search plug-in)
The design of wokoo scaffolding refers to create-react-app. I have also written an article analyzing the cra source code. Interested students can read this article👉create-react-app core source code interpretation.
Step-by-step tutorial on the construction process
- lerna: for project management
- wokoo-scripts: interact with users, pull wokoo-template, and generate the corresponding initial project
- wokoo-template: Provides a template to initialize a Wokoo project with basic configuration.There are two types of templates: react and vue
- Install lerna
npm i lerna@4 -g- Create project directory and initialize
mkdir wokoo
cd wokoo
lerna init- Open workspace and add
workspacesconfiguration in package.json
"workspaces": [
	"packages/*"
],- Create subproject
lerna create wokoo-scripts
lerna create wokoo-template
Written by wokoo-scripts
The main functions of wokoo-scripts are:
- commander gets the projectName typed by the user in the shell
- fs.writeFile creates file path
- Install wokoo-template template
- Read the template specified suffix file .md, .js, and replace the ejs syntax
- Remove redundant content
- Uninstall template
1.Create entrance
Enter packages/wokoo-scripts and create the bin/www file
#! /usr/bin/env node

require('../index.js');
Modify package.json and add bin field configuration
 "bin": {
    "wokoo": "./bin/www"
  }
Create the index.js file under wokoo-scripts as the project entry.
2.Install dependent modules
Introducing the third-party modules used:
chalk Chalk, enriches the text color displayed on the console
cross-spawn Open child thread
commander Parse commands in the command line
fs-extra operation file
inquirer Interactive command line tool, with which you can realize the command line selection function
metalsmith reads all files and implements template rendering
consolidate Unified template engine
Install dependencies and add soft links
npm install chalk@4 cross-spawn@7 commander@7 fs-extra@9 inquirer@8 metalsmith@2 consolidate@0.16 ejs@3 --save
npm link
3. Implement the init method and read command line instructions
Mainly use commander to read the project name entered by the user on the command line. At this time, execute wokoo my-app on the command line, and you can get the project name my-app in the code.
const chalk = require('chalk')
const spawn = require('cross-spawn')
const { Command } = require('commander')
const fs = require('fs-extra')
const path = require('path')
const inquirer = require('inquirer')
const packageJson = require('./package.json')
const modifyTemplate = require('./modifyTemplate')

let program = new Command()
init()
// 程序入口,读取命令行脚本,获得项目名称
async function init() {
  let projectName
  program
    .version(packageJson.version)
    .arguments('<project-directory>') // 项目目录名 参数格式:<必选> [可选]
    .usage(`${chalk.green(`<project-directory>`)}`)
    .action((name) => {
      projectName = name
      console.log('projectName:', projectName)
    })
    .parse(process.argv) // [node路径,脚本路径,参数]
		await createApp(projectName)
}
4.createApp method, generate the project based on the project name
Call the createApp method in the run method and pass in projectName.createApp mainly implements the functions of creating folders and writing package.json.
async function createApp(appName) {
  let root = path.resolve(appName) // 要生成的项目的绝对路径
  fs.ensureDirSync(appName) // 没有则创建文件夹
  console.log(`create a new app in ${chalk.green(root)}`)
  // 初始化package.json
  const packageJson = {
    name: appName,
    version: '0.0.1',
    private: true,
    scripts: {
      start: 'cross-env NODE_ENV=development webpack serve',
      build: 'webpack',
    },
  }
  // 写入package.json
  fs.writeFileSync(
    path.join(root, 'package.json'),
    JSON.stringify(packageJson, null, 2)
  )
  // 改变工作目录,进入项目目录
  process.chdir(root)
  await run(root, appName)
}
5. run: Copy the project template to the current project and generate a basic project
The following snippets run sequentially inside run(root, appName) and must be assembled into that function; the linked repository supplies the full templates and build configuration.
createApp finally calls the run method.run mainly does the following:
- Install wokoo-template
const templateName = 'wokoo-template' // 对应的wokoo模板
const allDependencies = [templateName]
// 安装wokoo-template包
console.log('Installing packages. This might take a couple of minutes')
console.log(`Installing ${chalk.cyan(templateName)} ...`)
try {
  await doAction(root, allDependencies)
} catch (e) {
  console.log(`Installing ${chalk.red(templateName)} failed ...`, e)
  throw e
}- Copy the corresponding template file to the temporary folder temp according to the template type selected by the user, replace the ejs template in it, and then delete the temporary folder temp
// 选择模板
  const repos = ['vue', 'react']
  const { targetTemplate } = await inquirer.prompt({
    name: 'targetTemplate',
    type: 'list',
    message: 'which template do you prefer?',
    choices: repos, // 选择模式
  })

  const templatePath = path.dirname(
    require.resolve(`${templateName}/package.json`, { paths: [root] })
  )

  // 复制文件到项目目录
  const scriptsConfigDir = path.join(templatePath, 'webpack.config.js')
  const gitIgnoreDir = path.join(templatePath, '.npmignore')
  const publicDir = path.join(templatePath, 'public')
  const tempDir = path.join(root, 'temp') // 临时模板路径
  const templateDir = path.join(templatePath, `${targetTemplate}-template`)
  // 从wokoo-template中拷贝模板到项目目录
  if (fs.existsSync(templatePath)) {
    // 将templateDir内模板拷贝到temp文件,并修改模板文件中的ejs配置项
    await modifyTemplate(templateDir, 'temp', {
      projectName: appName,
      basicProject: targetTemplate,
    })

    fs.copySync(tempDir, root) // 源 目标
    fs.copySync(publicDir, root + '/public')
    fs.copyFileSync(scriptsConfigDir, root + '/webpack.config.js')
    fs.copyFileSync(gitIgnoreDir, root + '/.gitignore')
    deleteFolder(tempDir)
  } else {
    console.error(
      `Could not locate supplied template: ${chalk.green(templatePath)}`
    )
    return
  }
Here, I encapsulate the copied functionality into modifyTemplate.js.Use the method provided by MetalSmith to traverse the files in the source path, use consolidate.ejs to replace the ejs syntax in the file, and then write the content into the new temporary folder temp.
const MetalSmith = require('metalsmith') // 遍历文件夹
let { render } = require('consolidate').ejs
const { promisify } = require('util')
const path = require('path')
render = promisify(render) // 包装渲染方法

/**
 *
 * @param {*} fromPath 源路径
 * @param {*} toPath 目标路径
 */
async function handleTemplate(fromPath, toPath, config) {
  await new Promise((resovle, reject) => {
    MetalSmith(__dirname)
      .source(fromPath) // 遍历下载的目录
      .destination(path.join(path.resolve(), toPath)) // 输出渲染后的结果
      .use(async (files, metal, done) => {
        // result 替换模板内数据
        let result = {
          license: 'MIT',
          version: '0.0.1',
          ...config,
        }
        const data = metal.metadata()
        Object.assign(data, result) // 将询问的结果放到metadata中保证在下一个中间件中可以获取到
        done()
      })
      .use((files, metal, done) => {
        Promise.all(Object.keys(files).map(async file => {
          if (!/\.(js|json|txt|md)$/.test(file)) return
          const content = files[file].contents.toString()
          if (content.includes('<%')) {
            const rendered = await render(content, metal.metadata())
            files[file].contents = Buffer.from(rendered)
          }
        })).then(() => done(), done)
      })
      .build((err) => {
        // 执行中间件
        if (!err) {
          resovle()
        } else {
          reject(err)
        }
      })
  })
}

module.exports = handleTemplate- Merge template.json and package.json, generate new package.json and execute
npm installagain
// 合并template.json和package.json
  let tempPkg = fs.readFileSync(root + '/template.json').toString()
  let pkg = fs.readFileSync(root + '/package.json').toString()
  const tempPkgJson = JSON.parse(tempPkg)
  const pkgJson = JSON.parse(pkg)

  pkgJson.dependencies = {
    ...pkgJson.dependencies,
    ...tempPkgJson.package.dependencies,
  }
  pkgJson.devDependencies = {
    ...tempPkgJson.package.devDependencies,
  }
  // 编写package.json
  fs.writeFileSync(
    path.join(root, 'package.json'),
    JSON.stringify(pkgJson, null, 2)
  )
  fs.unlinkSync(path.join(root, 'template.json')) // 删除template.json文件

  // 再次根据dependenciesToInstall执行npm install
  const dependenciesToInstall = Object.entries({
    ...pkgJson.dependencies,
    ...pkgJson.devDependencies,
  })
  let newDependencies = []
  if (dependenciesToInstall.length) {
    newDependencies = newDependencies.concat(
      dependenciesToInstall.map(([dependency, version]) => {
        return `${dependency}@${version}`
      })
    )
  }
  await doAction(root, newDependencies)
  console.log(`${chalk.cyan('Installing succeed!')}`)
Uninstall wokoo-template
jsawait doAction(root, 'wokoo-template', 'uninstall')
Now that the process implementation is introduced, the following two methods are the functional methods I encapsulated.
doAction: Use npm to install or uninstall project dependencies
Use cross-spawn to create a child process with cwd and reject on installation failure rather than continuing with an incomplete template.
async function doAction(root, allDependencies, action = 'install') {
  const dependencies = Array.isArray(allDependencies) ? allDependencies : [allDependencies]
  return new Promise((resolve, reject) => {
    const args = [action, '--save', '--save-exact', '--loglevel', 'error', ...dependencies]
    const child = spawn('npm', args, { cwd: root, stdio: 'inherit' })
    child.once('error', reject)
    child.once('close', code => {
      if (code === 0) resolve()
      else reject(new Error('npm ' + action + ' failed with exit code ' + code))
    })
  })
}
deleteFolder: Recursively delete files and folders, the input parameter is the path file path
function deleteFolder(path) {
  let files = []
  if (fs.existsSync(path)) {
    if (!fs.statSync(path).isDirectory()) {
      // path是文件,直接删除
      fs.unlinkSync(path)
    } else {
      // 删除文件夹
      files = fs.readdirSync(path)
      files.forEach(function (file) {
        let curPath = path + '/' + file
        deleteFolder(curPath)
      })
      fs.rmdirSync(path)
    }
  }
}
Wokoo-template preparation
- Divided into vue-template and react-template
- vue-template and react-template respectively correspond to a vue or react basic project configured by webpack
- Use ejs template to implement wokoo-scripts injection variables
The template is relatively simple, using webpack+vue or react to build a lightweight project respectively.
The specific code can be seen👉wokoo/wokoo-template
Post wokoo
Before publishing, check the package.json files allowlist, ignore rules and npm default inclusions. Use npm pack --dry-run to inspect package contents; omitting files does not mean nothing is published.
- Add "modifyTemplate.js" to the
filesfield of package.json in wokoo-scripts - Add "react-template", "vue-template", "public", "webpack.config.js", ".gitignore" to the
filesfield of wokoo-template's package.json
I forgot to add the files field before, so I found that the files were missing after publishing.There are questions to read: https://stackoverflow.com/questions/27049192/npm-publish-isnt-including-all-my-files
The last step is done!🎉
lerna publishwokoo use
For the specific usage process, you can read Instructions for use of oil monkey scaffolding wokoo
1.1 Project installation & initial configuration
npm i wokoo -g
wokoo zhihu-help
Select template
- [ ] vue
- [ ] react
Choose react here and wait for the project to be installed.After the project installation is complete, execute the following commands according to the prompts:
cd zhihu-helper
npm start- Open the Tampermonkey script editor and copy the contents of tampermonkey.js into it.
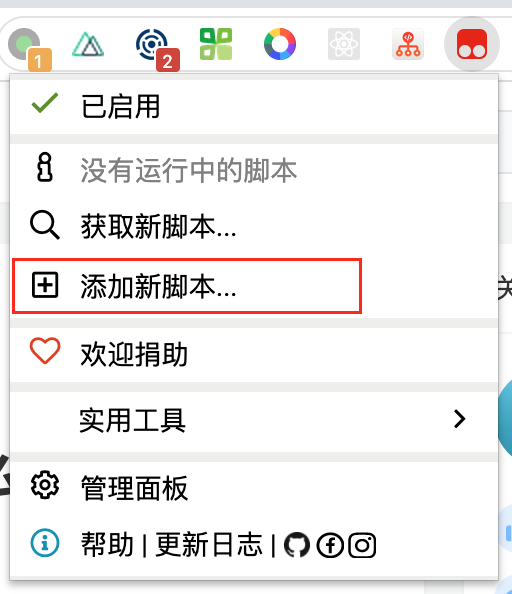
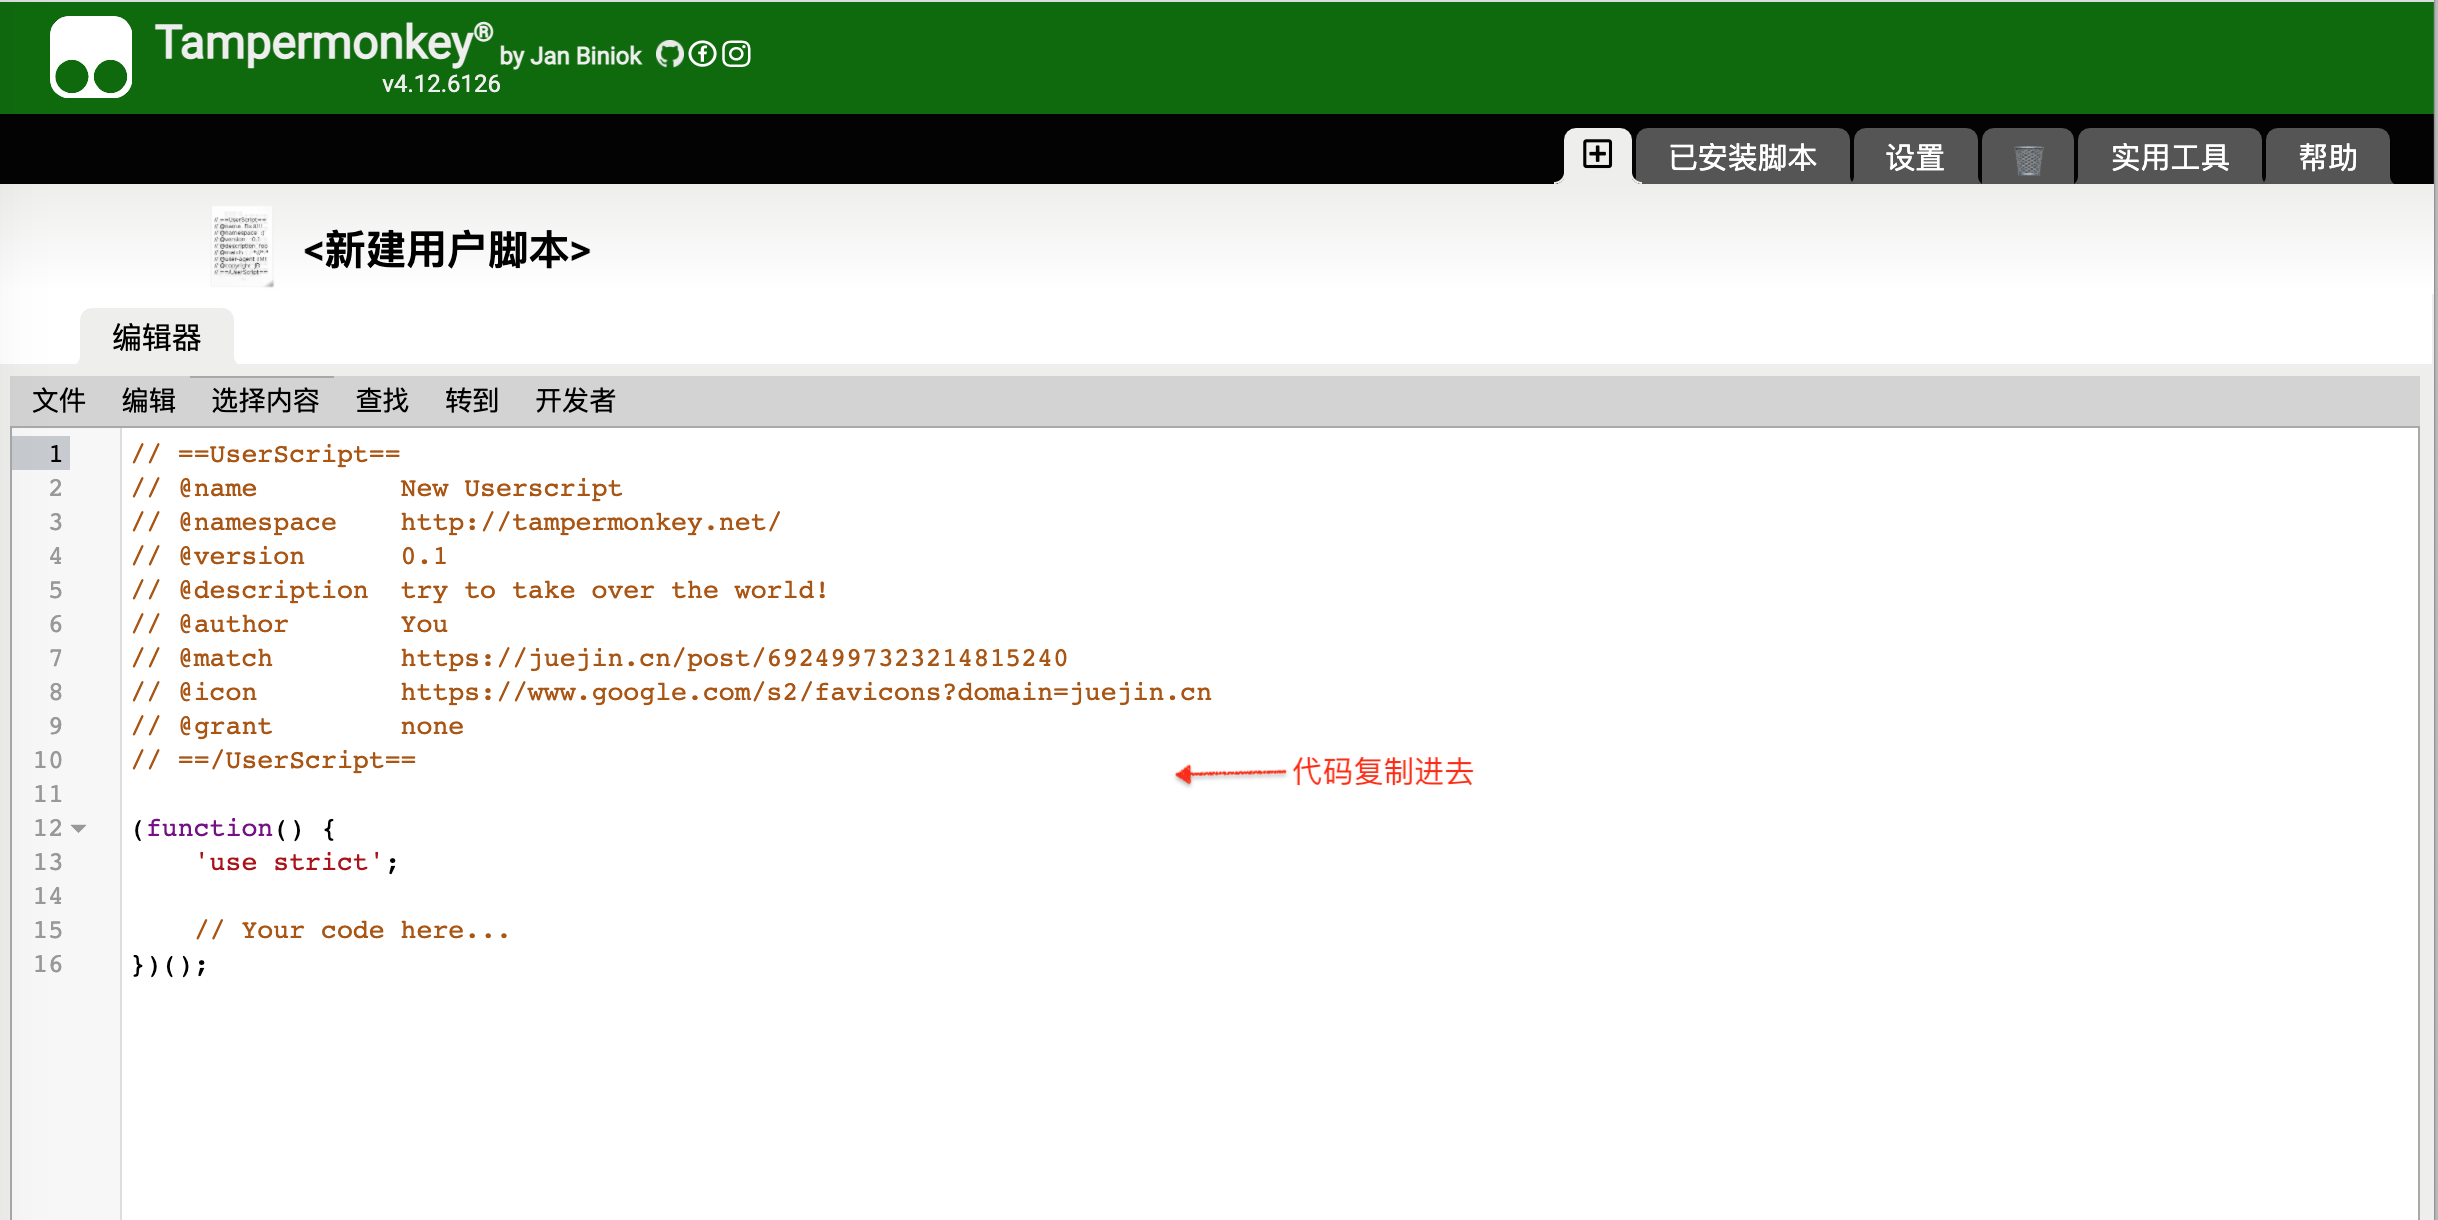
- Open web page Zhihu column , a monkey icon appears in the upper right corner, indicating that the project has been completed.
Additional Note
Some browsers here do not display the monkey icon.Open the console and see the error:
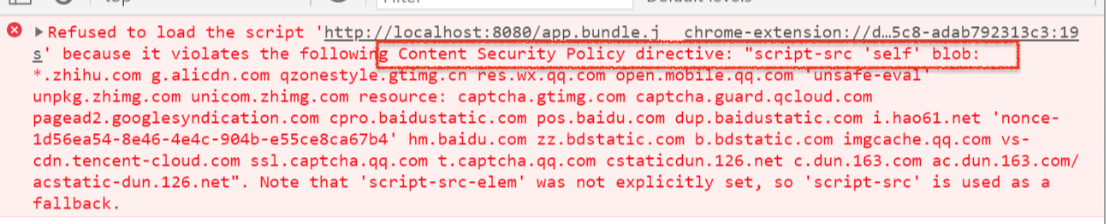
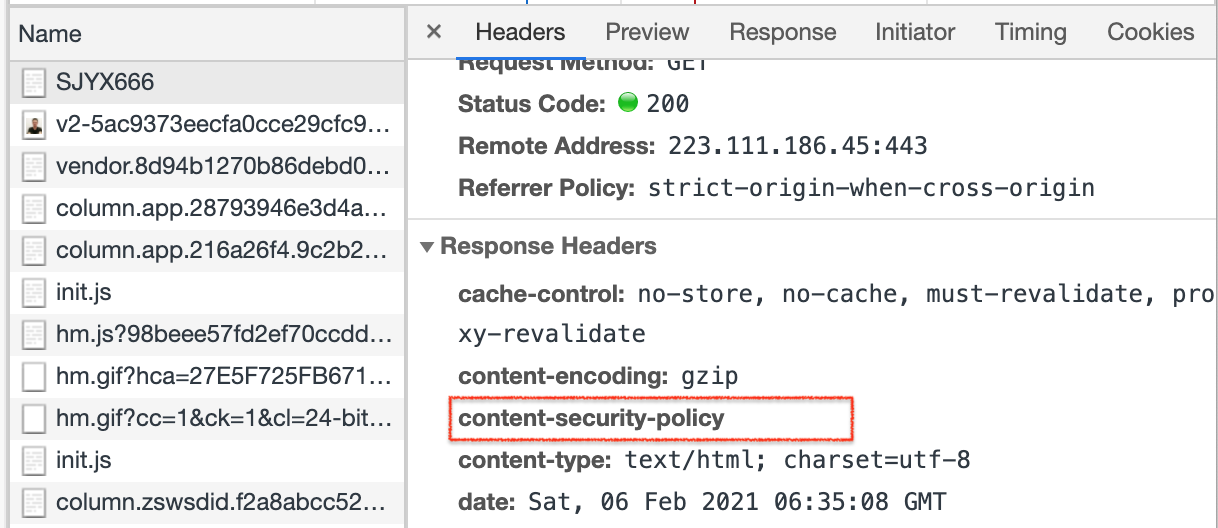
The reason is that Zhihu uses the csp content security policy, which only allows loading js of the specified domain name.For details, please read 👉 Content Security Policy (CSP)
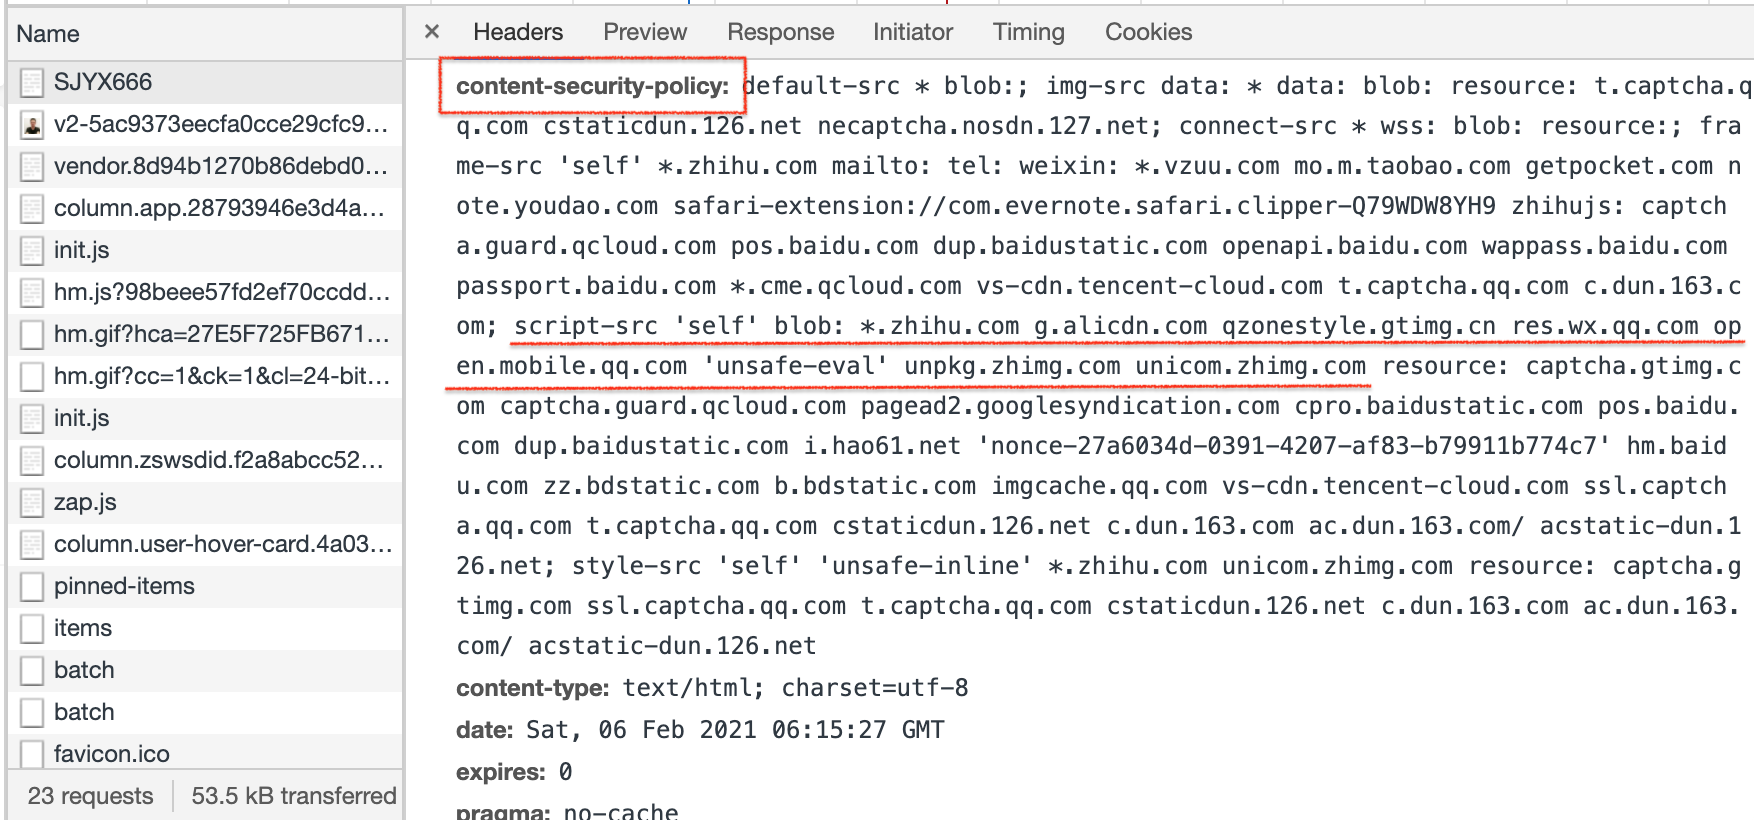
How to bypass this security policy, here are two methods:
- Install the plug-in Disable Content-Security-Policy, enable the plug-in when debugging the Zhihu page, and automatically set the content-security-policy to empty.
- Students who know how to configure Charles can set up a forwarding rule.
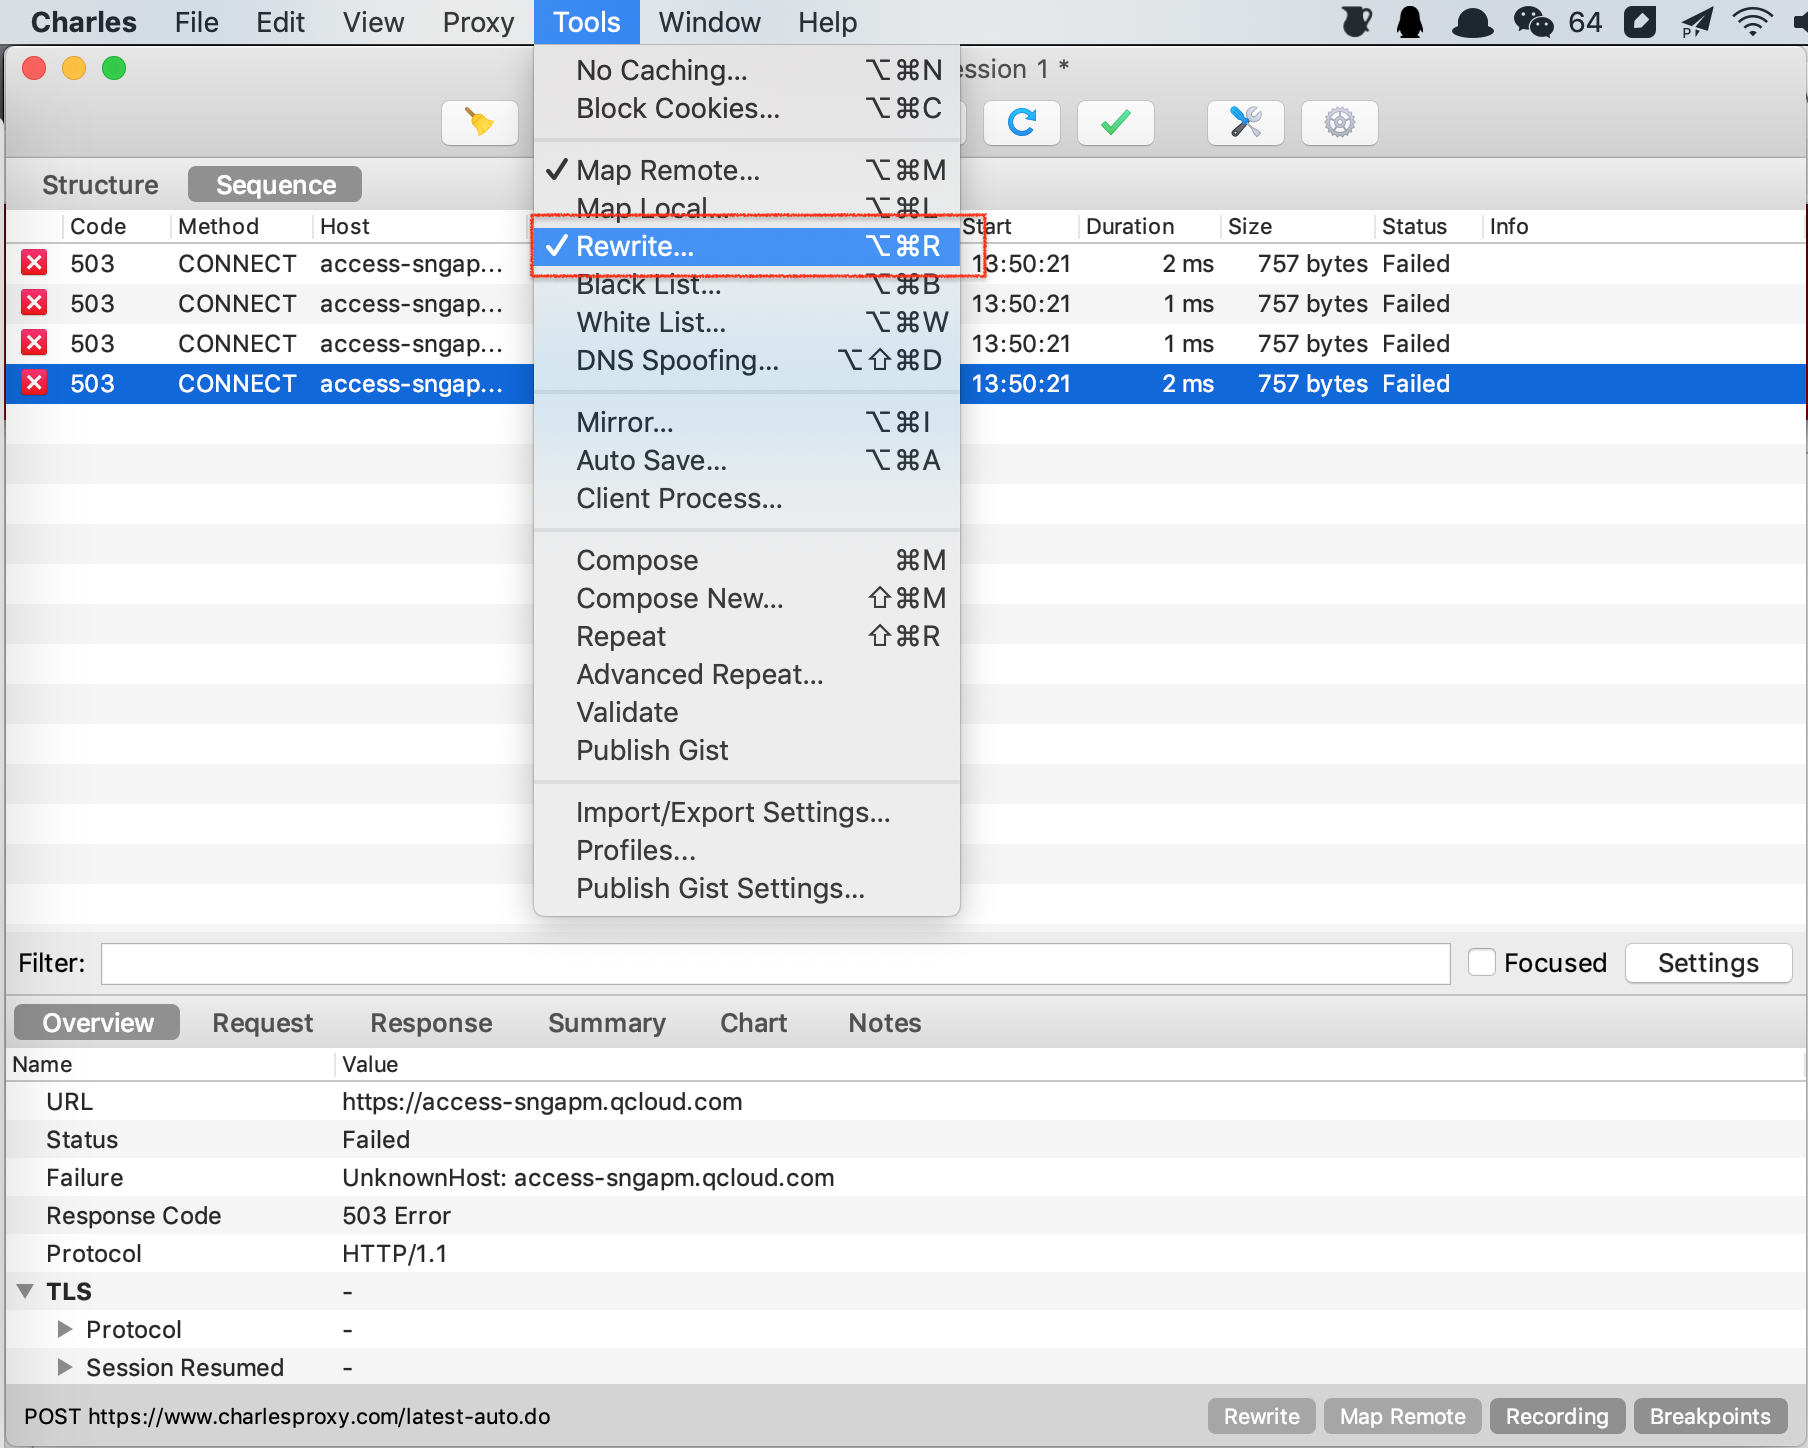
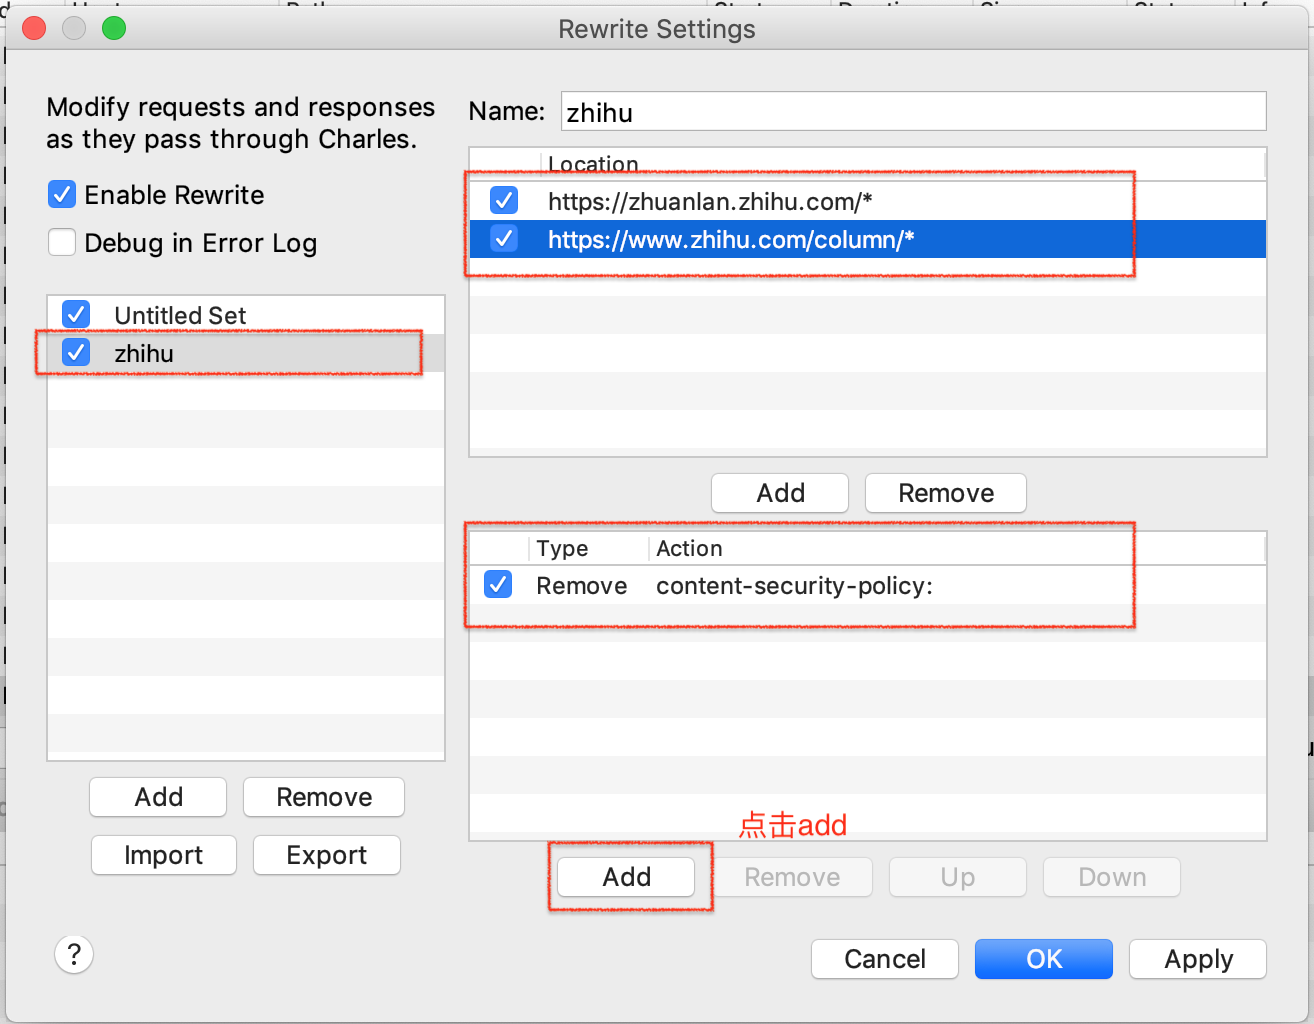
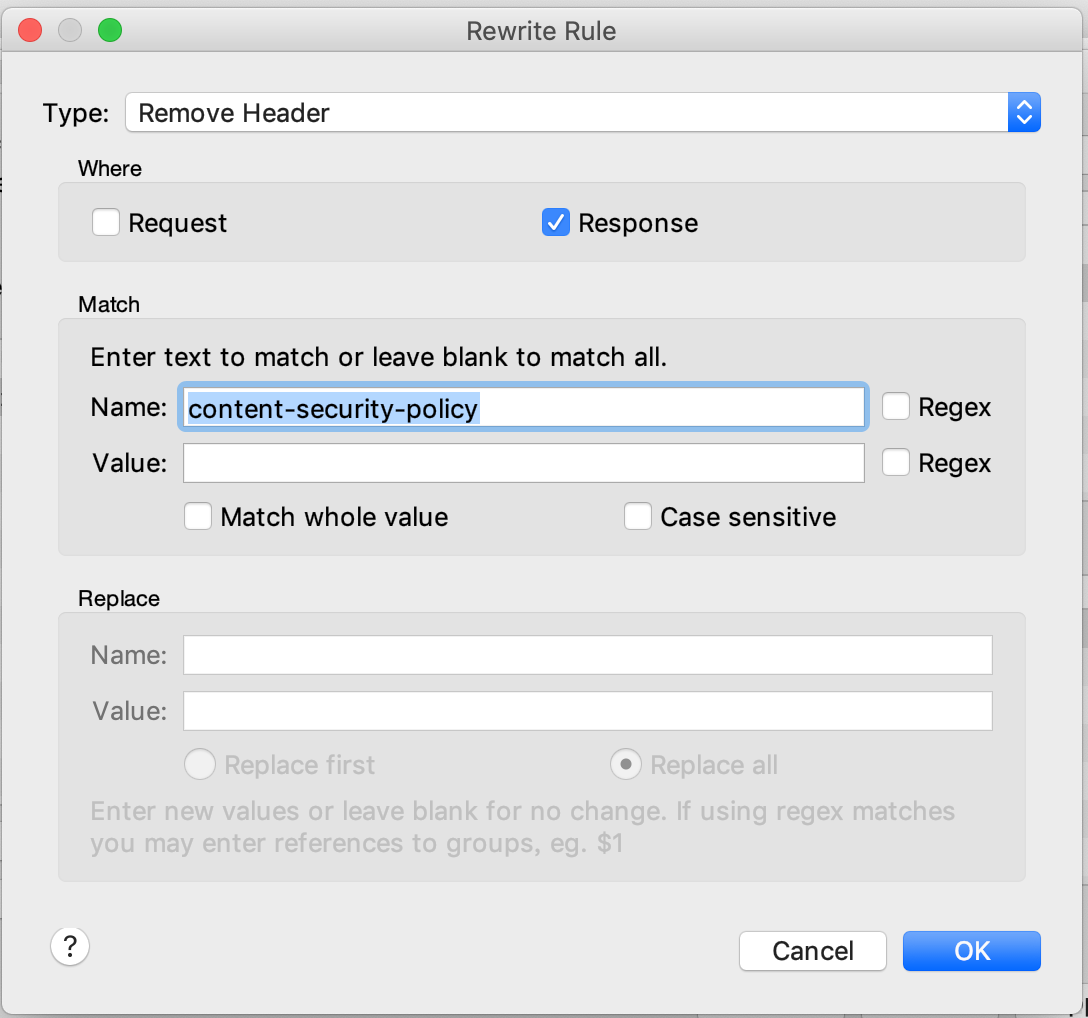
Both methods can bypass security policies.
When encountering this CSP content security policy web page, you cannot use the managed CDN method when going online to the Oil Monkey Store. You must copy the code into the edit box.
1.2 Develop basic functions
Organize your thoughts
- Draw the left drawer pop-up window
- When the pop-up window pops up, request the Zhihu list interface and get the list data.
- Implement loading more functions when pulling down
Let’s implement it step by step~
Step 1. Draw the left drawer pop-up window
Mainly through this.state.show to control the display and hiding of pop-up windows.This step is quite simple. You can look at the code directly: step1. You can replace the app in the index.js entrance with step1 to see the effect.
Step 2. Request the Zhihu List interface to obtain list data
- Install axios and import
npm install axios- Calculate request parameters
Analyzing the requested URL, we can see that the request interface is:
`https://www.zhihu.com/api/v4/columns${this.queryName}/items?limit=20&offset=${offset}`Where this.queryName is the column name, which is the pathname when the page is Column List Page; when the page is Column Details Page, it needs to be obtained through the href of the a tag with the class name ColumnPageHeader-TitleColumn.
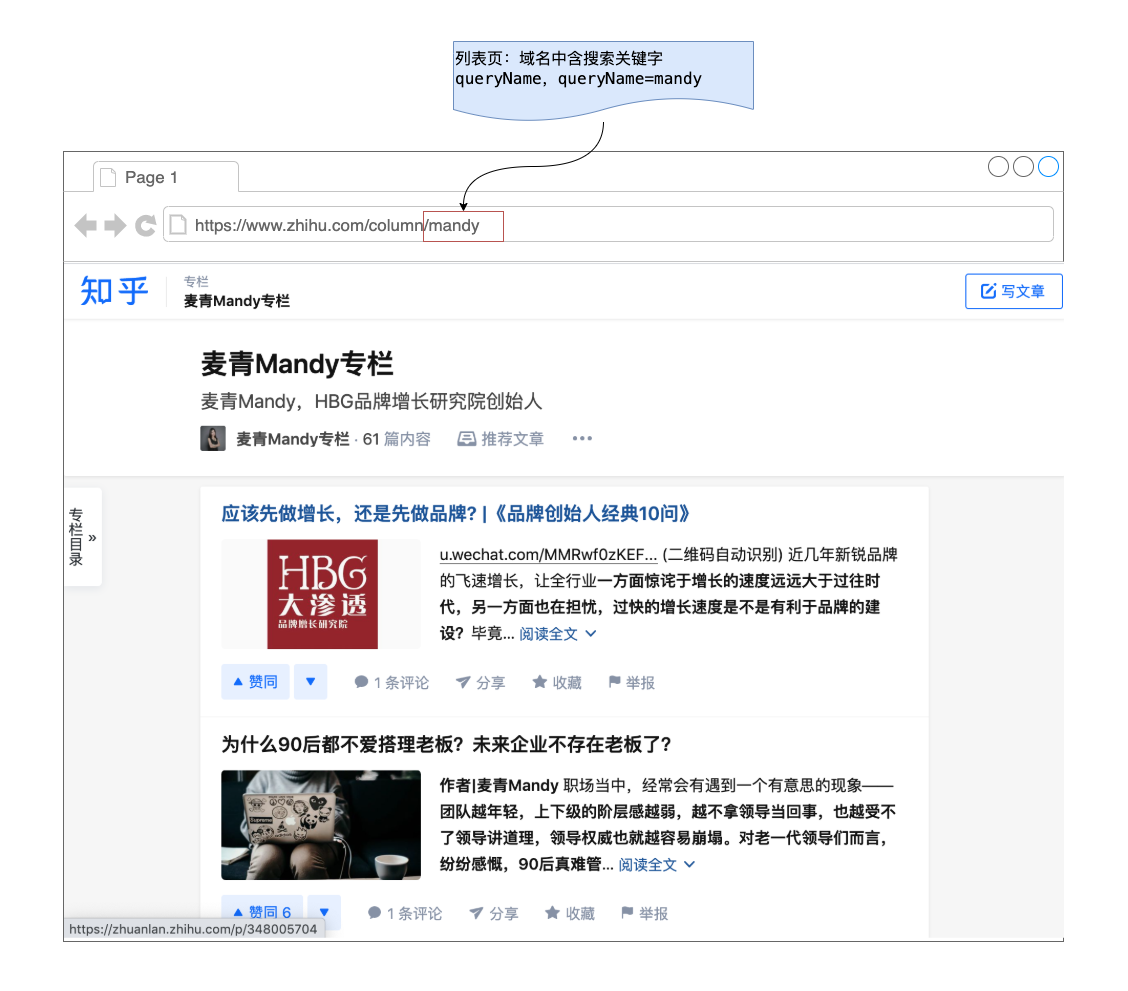
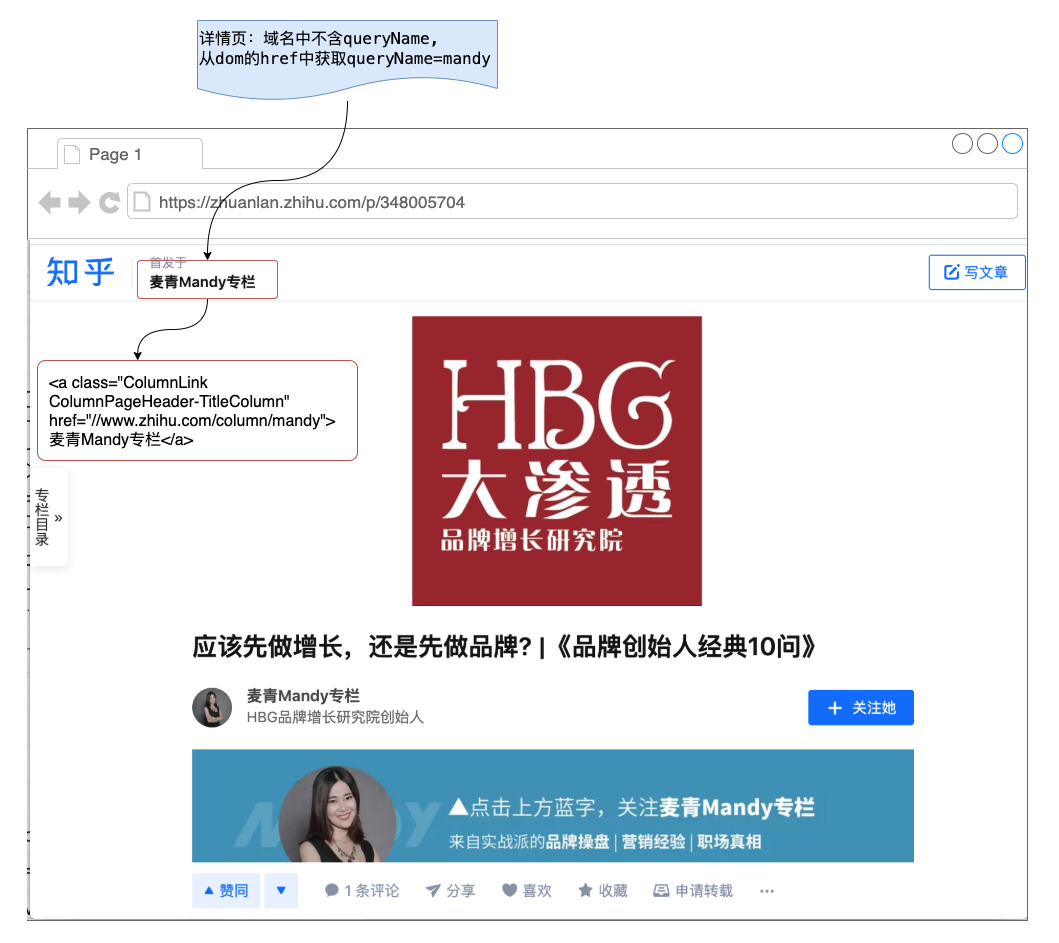
You should better understand the getQueryName method through these two pictures.
getQueryName = () => {
    let pathname = location.pathname
    let detailRegExp = /^\/p\/\d+/
    let queryName = ''
    // 专栏详情页
    if (detailRegExp.test(pathname)) {
      let aTage = document.getElementsByClassName(
        'ColumnPageHeader-TitleColumn'
      )
      let url = aTage[0].href
      queryName = url.slice(url.lastIndexOf('/'))
    } else {
      // 专栏列表页
      // http://zhuanlan.zhihu和http://zhihu/column两种情况都是专栏
      if (pathname.indexOf('/column') === 0) {
        pathname = pathname.slice('/column'.length)
      }
      queryName = pathname
    }
    this.queryName = queryName
  }
There are two domain names on the list page: https://www.zhihu.com/column/mandy and https://zhuanlan.zhihu.com/mandy So in else logic for https://www.zhihu.com/column/mandy Processed and only retained /mandy
Through the getQueryName method, we obtain the request parameters
- Send a request to pull a directory listing
getList = async () => {
    if (!this.state.hasMore) return
    let { offset } = this.state
    let { data } = await axios.get(
      `https://www.zhihu.com/api/v4/columns${this.queryName}/items?limit=20&offset=${offset}`
    )
    let list = data.data.map((i) => ({
      title: i.title,
      url: i.url,
      id: i.id,
      commentCount: i.comment_count,
      voteupCount: i.voteup_count,
    }))
    if (data.paging.is_end) {
      this.setState({ hasMore: false })
    }
    offset += limit

    this.setState({
      list: [...this.state.list, ...list],
      offset,
    })
  }
The second step process has been implemented. The code is here👉step2. You can replace the app in the index.js entrance with step2 to see the effect.
At this time, the effect of the plug-in is like this. Except that there is no pull-down loading function, everything else is basically completed.
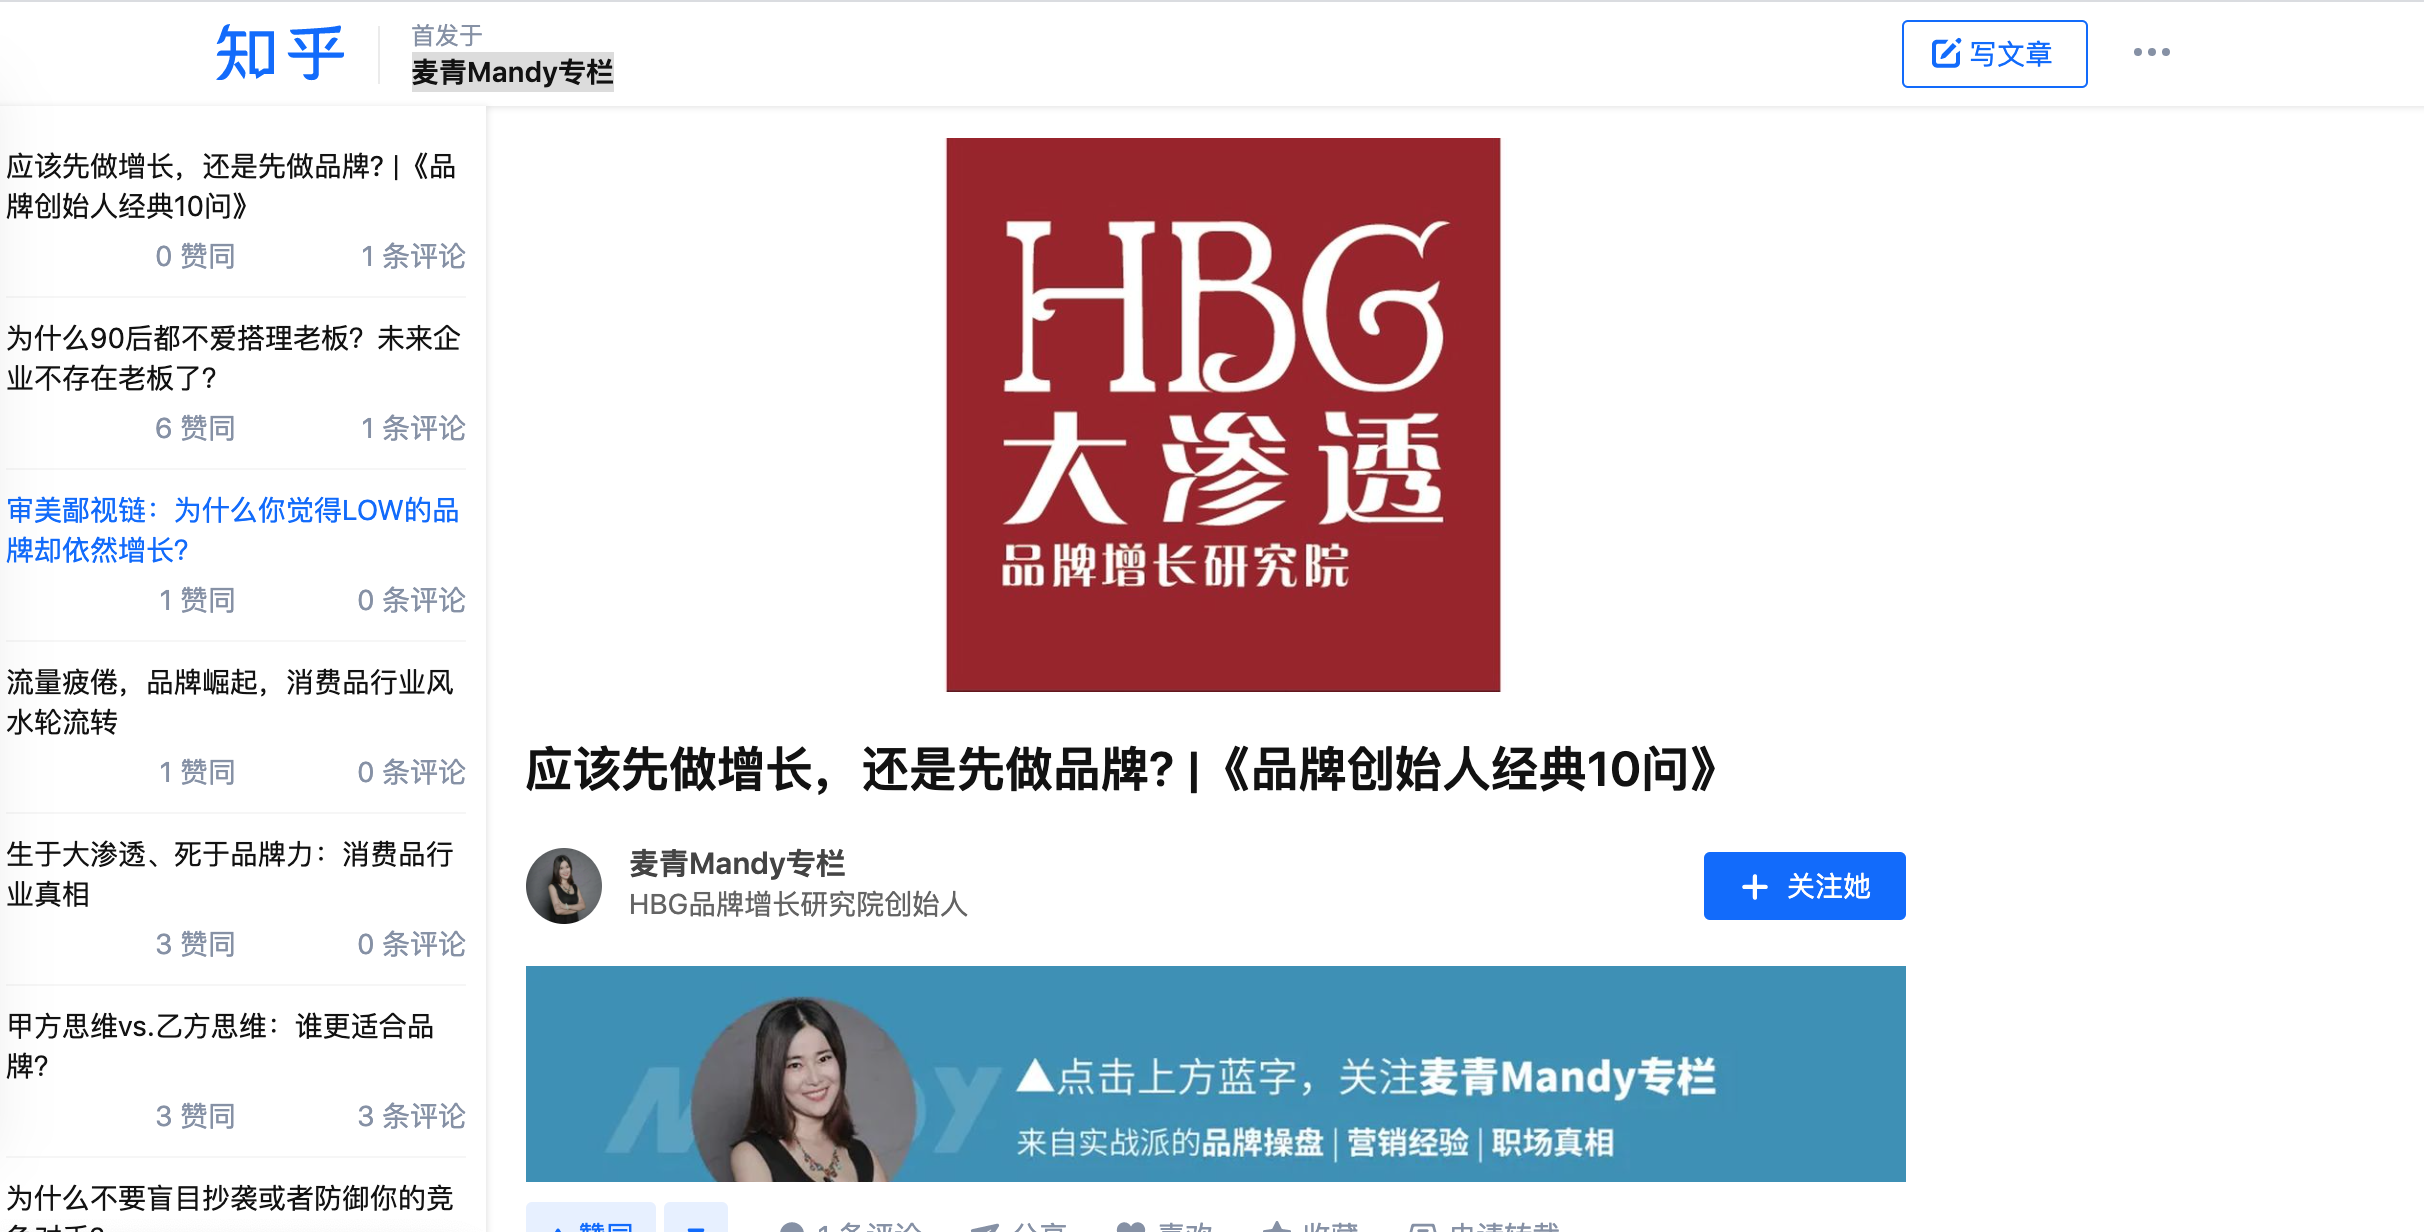
Step 3. Load more functions when pulling down
The infinite scroll component introduces the third-party library react-infinite-scroll-component:
npm install react-infinite-scroll-componentThe main thing is to add the InfiniteScroll component in the render function. Note that the height of InfiniteScroll needs to be calculated to a fixed value, otherwise scrolling cannot be triggered.
<ul className="list-ul" onMouseLeave={this.handleMouseLeave}>
  <InfiniteScroll
		dataLength={list.length}
		next={this.handleInfiniteOnLoad}
		hasMore={hasMore}
		loader={<h4>Loading...</h4>}
    height={document.documentElement.clientHeight - 53}
		endMessage={
  		<p style={{ textAlign: 'center' }}>
    		<b>到底了,没内容啦~</b>
			</p>
		}
  >
    {list.map((i) => (
      <li className="list-li" key={i.id}>
      ...
      </li>
))}
  </InfiniteScroll>
</ul>
At this time, the function has been developed, please view the specific code 👉app.js
3. Deploy the plug-in to the Oil Monkey Store
3.1 Build
execute command
npm run build3.2 Confirm the Tampermonkey script file tampermonkey.js
//@xxx that are commented out in this file have meanings and can be understood according to tampermonkey development documentation.
@description Plug-in description
@match specifies certain domain names to enable this plug-in. Two are configured by default.
// @match https://*/*and// @match https://*/*Indicates that it is enabled under all domain names.But here we hope to only use this plug-in in the zhihu column, so we need to modify the @math field.js// @match https://zhuanlan.zhihu.com/* // @match https://www.zhihu.com/column/*@require Oil Monkey Script internally helps introduce third-party resources, such as jquery, react, etc.
js// @require https://unpkg.com/react@17/umd/react.production.min.js // @require https://unpkg.com/react-dom@17/umd/react-dom.production.min.js
3.3 Publish plug-ins to the Oil Monkey Market
The advantage of publishing on the Oil Monkey Market is that there is no need for review and it can be used immediately, which is very convenient.
- Deploy the /dist/app.bundle.js file to cdn and obtain the corresponding url.
Note:
The js files can be placed on github. If they are hosted on github, it is best to use cdn acceleration (I use cdn.jsdelivr.net for cdn acceleration).
If you don’t have a cdn server, you can skip this step and directly copy app.bundle.js to the Oil Monkey Script Editor in step 4.
Log in to Greasyfork Market, either Google account or github account can be used.
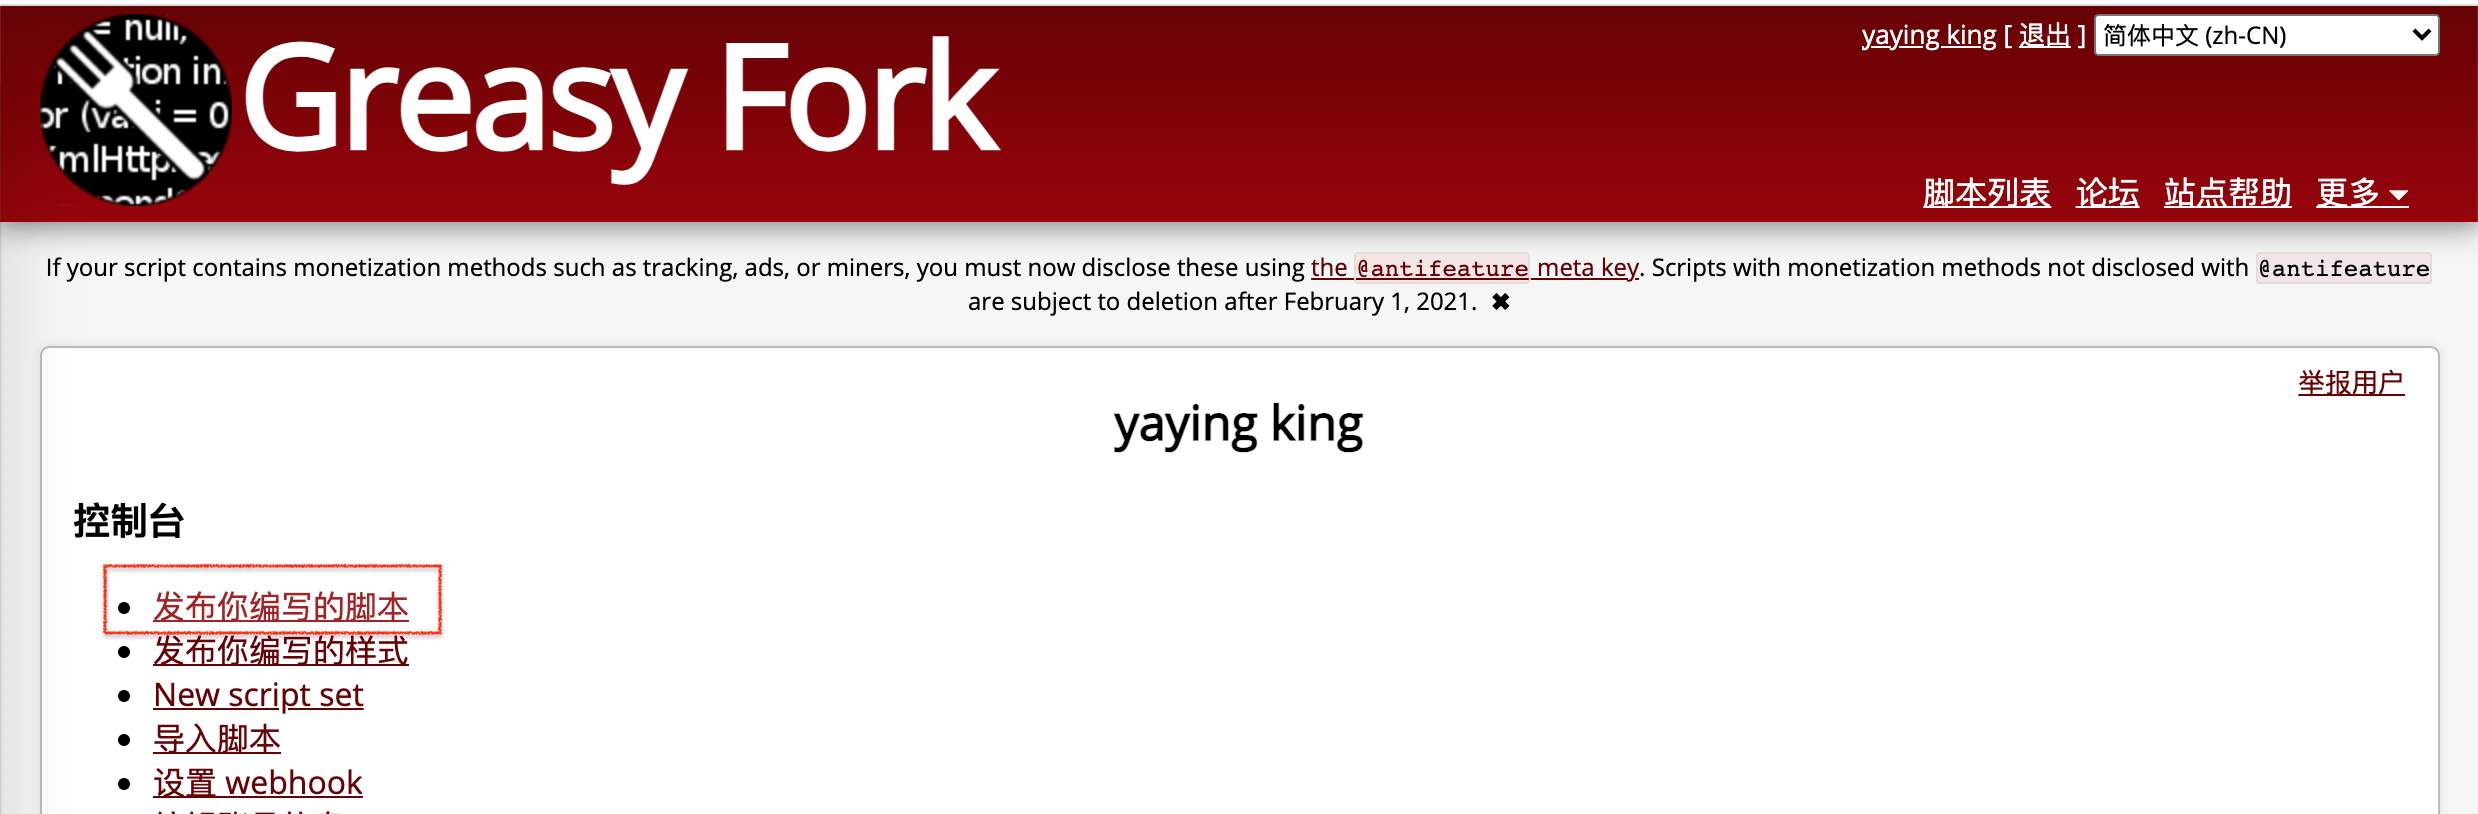
Click on the account name, then click "Publish the script you wrote"
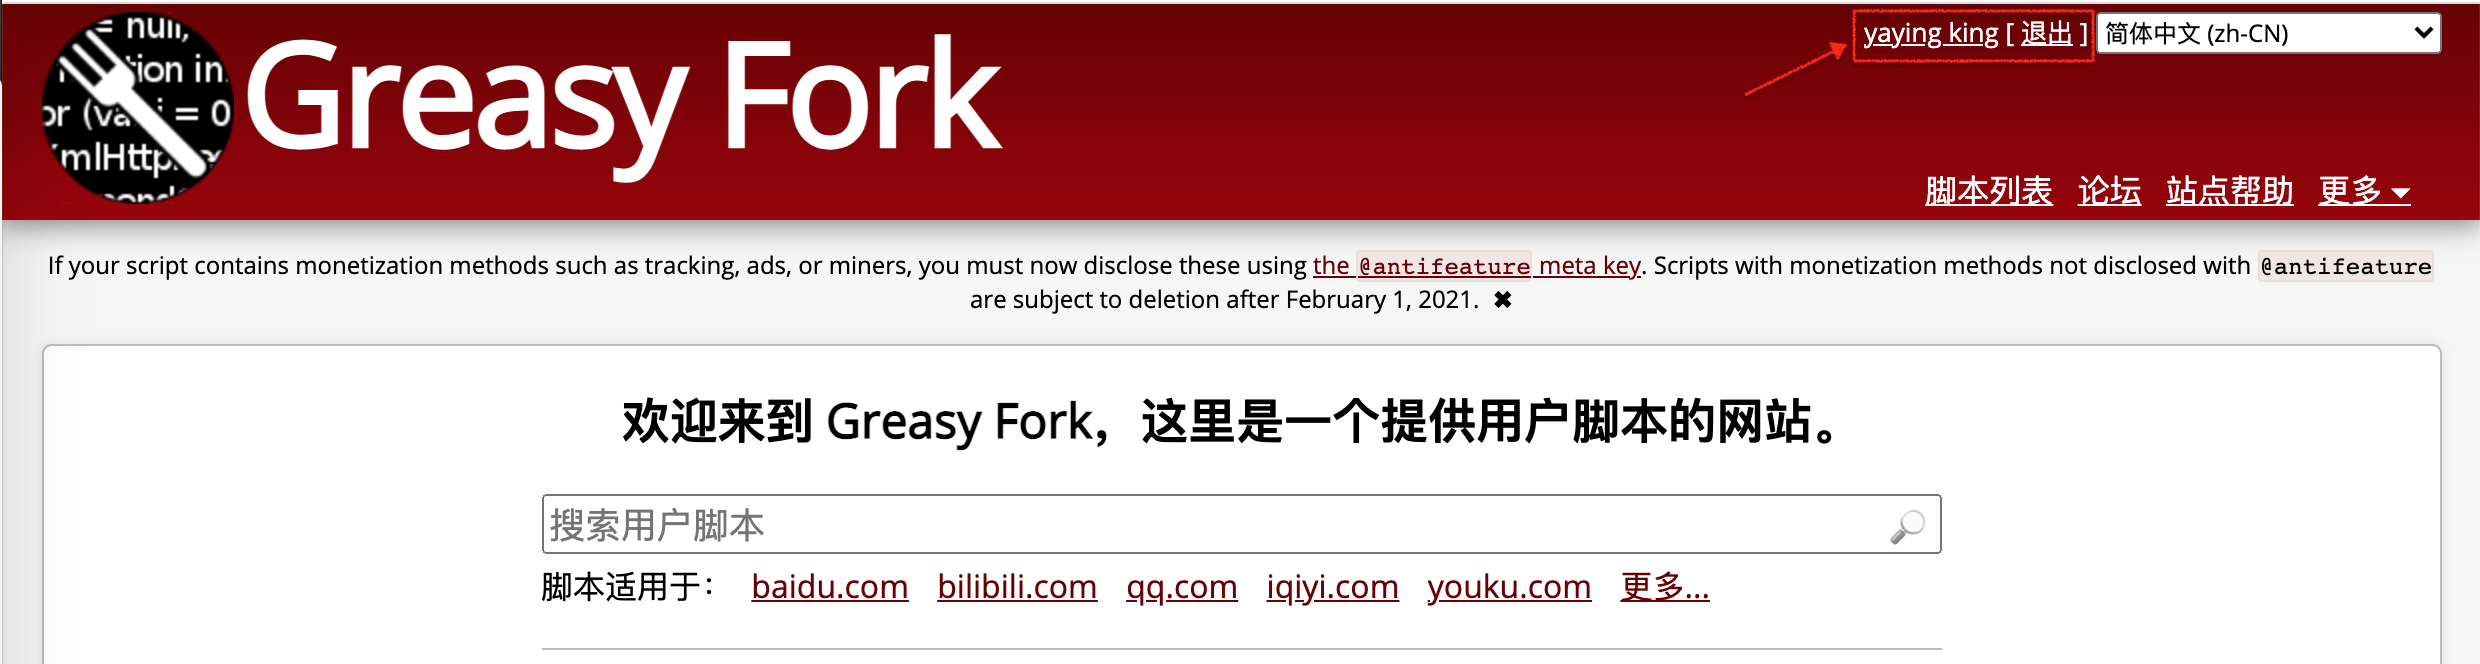
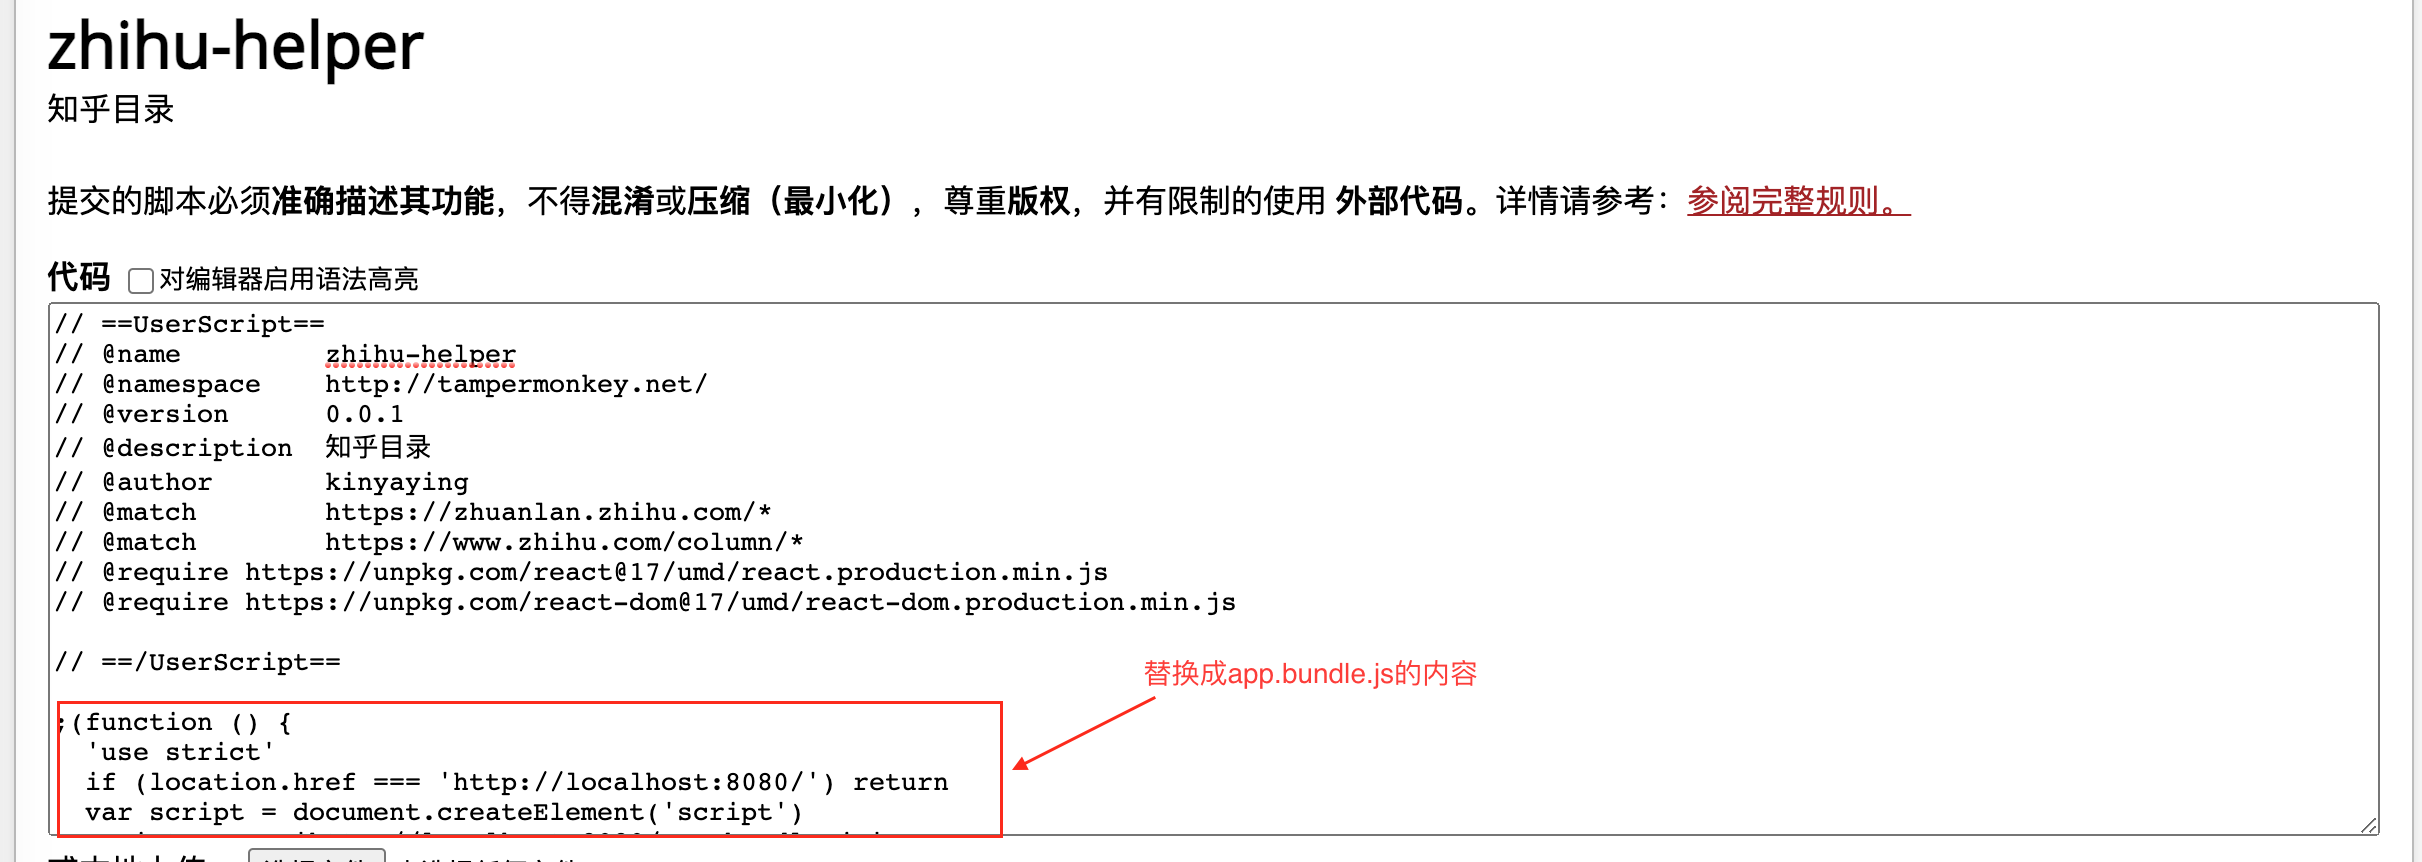
Enter the editing page and copy the contents of tampermonkey.js into the editing box
Note:
If a cdn is hosted in step 1, you need to replace the
localhost:8080URL in the code with a static resource urlThere is no managed CDN in step 1, so you cannot directly copy the contents of the /dist/app.bundle.js file into the edit box.Because there is a maximum limit on the code in the edit box, the app.bundle.js we built exceeds the maximum limit by building in third-party libraries such as react.
Need to unpack the build results
4.1 Modify tampermonkey.js and introduce react and react-dom through @require method
js// ==UserScript== // @name zhihu-helper // @namespace http://tampermonkey.net/ // @version 0.0.1 // @description 知乎目录 // @author xx // @match https://zhuanlan.zhihu.com/* // @match https://www.zhihu.com/column/* // @require https://unpkg.com/react@17/umd/react.production.min.js // @require https://unpkg.com/react-dom@17/umd/react-dom.production.min.js // ==/UserScript== // app.bundle.js构建好的代码4.2 Modify the entry field of webpack.config.base.js
jsentry: { app: '/src/index.js', vendor: [ // 将react和react-dom这些单独打包出来,减小打包文件体积 'react', 'react-dom', ], },4.3 Re-execute
npm run buildto build a new app.bundle.js and copy it to the edit box of Oil Monkey Market.
- Click "Publish Script"